


Your Cart Is Our Priority
Explore our store to see what our products and resources can do for you.

TL;DR:
- Adjusting golf cart suspension involves replacing worn springs first, then torquing bolts at ride height to prevent bushing bind. Proper tire pressure, regular inspection, and strategic upgrades ensure sustained ride comfort and handling. Most suspension fixes fail when owners overlook foundational issues like sagging springs or improper torqueing.
Adjusting golf cart suspension is the process of tuning springs, shocks, and bushings to achieve optimal ride comfort and handling performance. Whether you’re crossing rough terrain at a resort or cruising a neighborhood path, the right suspension setup changes how your cart feels under your feet. This guide covers every component involved, the tools you need, and the exact steps to follow. You’ll also find troubleshooting tips and upgrade options that apply to popular brands like EZGO, Club Car, and Yamaha.
Golf cart suspension adjustment works by modifying the tension, position, or condition of three core components: springs, shocks, and bushings. Springs are the load-bearing foundation. They absorb the initial impact of bumps and carry the weight of the cart and its passengers. Shocks do not bear weight but control the motion of springs to prevent excessive bouncing. That distinction matters because it tells you where to start when something feels wrong.
Bushings are the flexible rubber or polyurethane sleeves that sit at mounting points throughout the suspension. They reduce metal-on-metal contact and absorb vibration. When they wear out, you feel it as a clunk or shimmy through the frame. Tire pressure also plays a direct role in ride quality. Proper tire inflation at 12 to 15 PSI for street tires and 8 to 12 PSI for off-road use flexes the sidewall to absorb bumps before the suspension even has to react.
Front and rear suspension designs vary by brand. Club Car DS models typically use a leaf spring setup in the rear and coil-over shocks up front. Yamaha G-series carts often run a similar configuration. EZGO TXT models use a front independent suspension with coil springs. Knowing your cart’s layout before you start saves time and prevents you from ordering the wrong parts.
Understanding what each part does gives you a clear picture of what you’re actually adjusting when you work on the suspension.
Springs are the primary load-bearing parts. Leaf springs are common in rear suspensions and handle heavier loads well. Coil springs appear more often in front suspensions and offer a smoother, more progressive feel. When springs sag or bottom out under load, no amount of shock adjustment will fix the ride. Springs must be replaced first to restore ride quality before you address anything else.
Shocks control how quickly the spring compresses and rebounds. A worn shock lets the spring oscillate freely, which causes the cart to bounce repeatedly after hitting a bump. Worn shocks increase braking distance by up to 20% due to front-end dive during deceleration. That’s a safety issue, not just a comfort issue.
Bushings sit at every pivot and mounting point. They wear faster on carts used on rough terrain or loaded heavily. Worn bushings cause clunking, vibration, and steering looseness.
Pro Tip: Check tire pressure before touching any suspension hardware. A simple pressure adjustment from 18 PSI down to 13 PSI can transform a harsh ride without spending a dollar.
Getting the right tools together before you start prevents mid-job delays and keeps the work safe.
| Tool | Purpose |
|---|---|
| 14mm or 9/16" socket wrench set | Removing and installing shock and spring bolts |
| Torque wrench | Tightening bolts to spec (25 to 35 ft-lbs) |
| Penetrating oil (e.g., PB Blaster) | Loosening corroded or seized fasteners |
| Floor jack and jack stands | Safely lifting and supporting the cart |
| Safety glasses and gloves | Protecting eyes and hands during work |
| Tire pressure gauge | Confirming correct PSI before and after adjustments |
Replacing golf cart shocks costs $140 to $200 and requires a 14mm or 9/16" socket wrench and a torque wrench. That cost range assumes you’re doing the labor yourself. Budget more if you’re also replacing springs or bushings at the same time.
Workspace preparation matters as much as the tools themselves. Work on a flat, level surface with good lighting. Apply penetrating oil to all suspension bolts 15 to 20 minutes before you start turning anything. This step alone prevents stripped bolts and broken fasteners, which are the most common DIY setbacks. You can find detailed guidance on safe tool use for automotive suspension work that applies directly to golf cart maintenance.
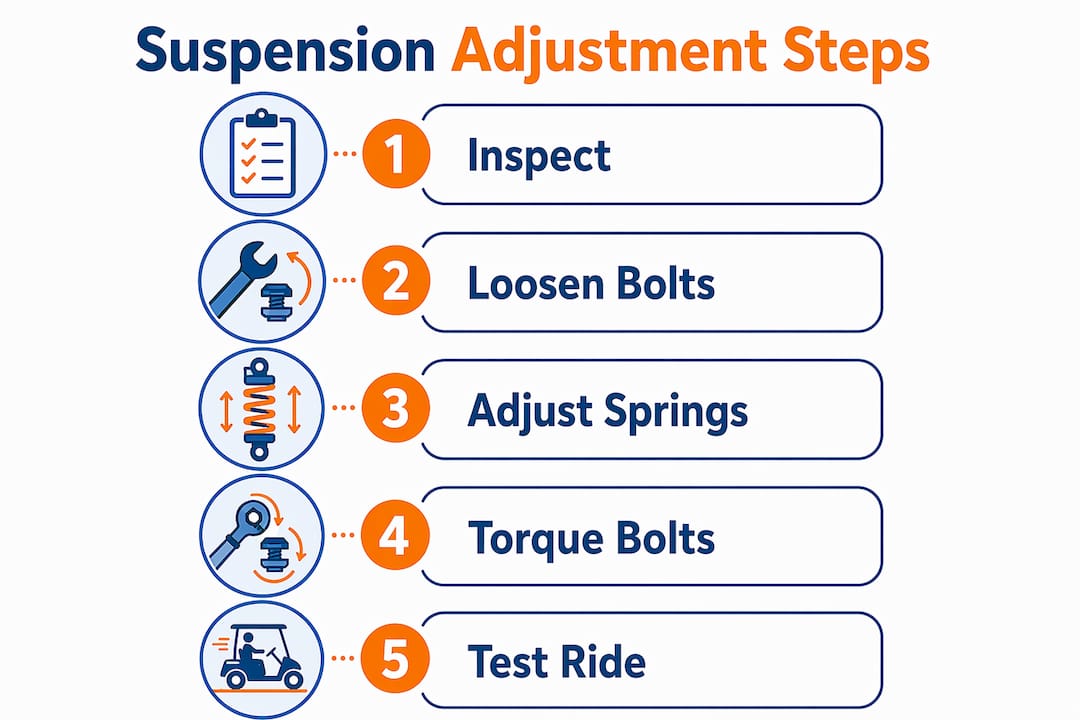
Follow this sequence to work through a full suspension adjustment or component replacement without missing a critical step.
Perform the bounce test. Push down firmly on each corner of the cart and release. Healthy shocks allow one or two bounces before settling. More than two oscillations means the shock is worn and needs replacement. This test takes two minutes and tells you exactly which corners need attention.
Inspect springs for sag or damage. With the cart on jack stands, look at the spring profile. A sagging leaf spring will sit noticeably lower than its original arc. Coil springs that have lost height or show cracks need replacement. Many owners mistakenly focus on shocks before springs, yet springs are the primary load-bearing parts. Replace worn springs before installing new shocks.
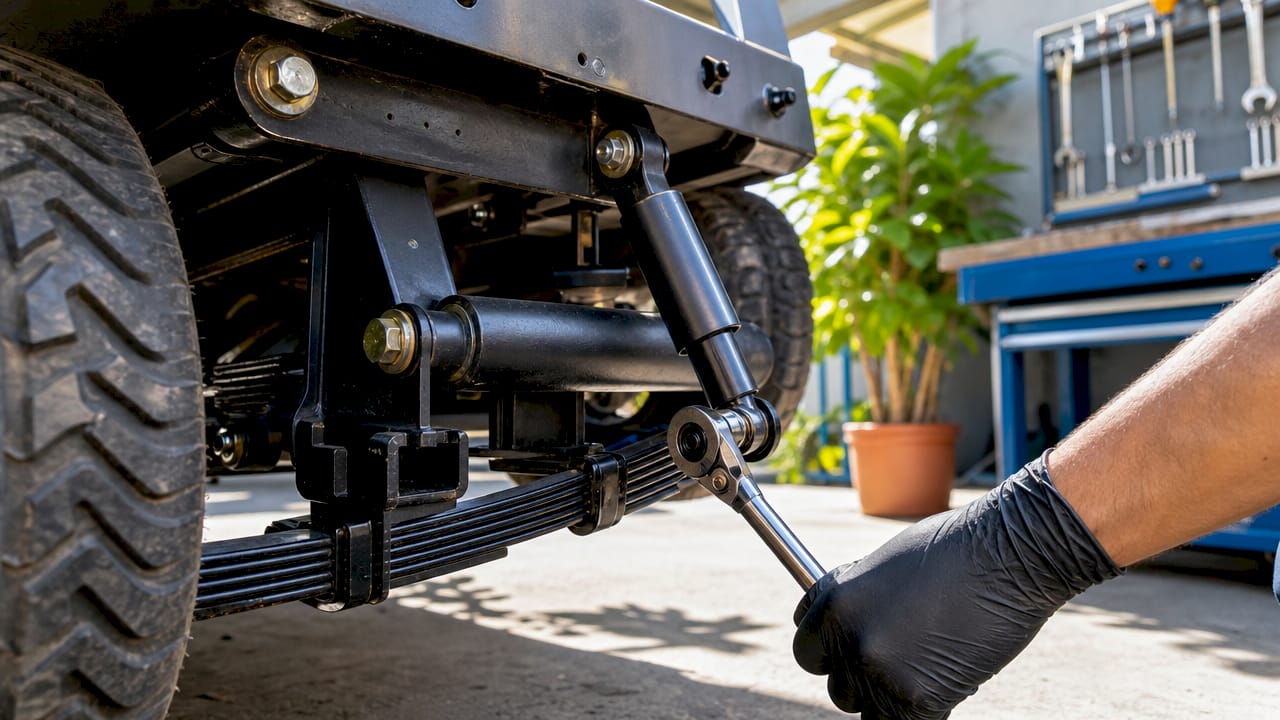
Remove the old shocks. Use your socket wrench to remove the upper and lower mounting bolts. If bolts resist, apply more penetrating oil and wait. Forcing a seized bolt strips the threads and creates a much bigger problem. Support the suspension arm with your hand as the shock comes free so it doesn’t drop suddenly.
Install new shocks. Thread the mounting bolts in by hand first. Do not torque them yet. The cart must be at normal ride height before you apply final torque. This prevents bushing bind, which occurs when rubber bushings are twisted under tension at full suspension droop.
Replace bushings if needed. Worn leaf spring bushings cause clunking vibrations that are easy to diagnose visually or with a pry bar. Slide the old bushing out and press the new one in. Always replace front or rear bushing sets together. Replacing individual bushings causes uneven wear and handling inconsistency.
Lower the cart to ride height, then torque all bolts. Torque specs are generally 25 to 35 ft-lbs for shock bolts. Bolts should be torqued only after lowering the cart to normal ride height to avoid bushing bind. Incorrect torque while suspension hangs shortens bushing lifespan drastically.
Recheck tire pressure and test drive. Set pressure to the correct PSI for your terrain, then drive over a known bump. The cart should absorb the impact cleanly with no excessive bounce or clunking.
Pro Tip: Mark the original position of any adjustable components with a paint pen before removal. This gives you a reference point if the new setup feels off and you need to compare.
Suspension components wear gradually, so knowing what to look for keeps small problems from becoming expensive repairs.
Inspect suspension bushings every two weeks for carts used heavily, and every six months or 500 hours for standard use. Catching wear early prevents the steering play and clunking that develop when bushings deteriorate completely. A quick visual check and a firm push on each suspension arm takes less than five minutes.
Common warning signs to watch for:
| Symptom | Most Likely Cause | First Action |
|---|---|---|
| Clunking over bumps | Worn bushings | Inspect and replace bushing sets |
| Excessive bounce | Worn shocks | Perform bounce test, replace shocks |
| Sagging ride height | Weak or broken springs | Inspect spring profile, replace if sagging |
| Steering looseness | Front end bushing wear | Check front suspension pivot points |
| Harsh ride on smooth surfaces | Overinflated tires | Adjust PSI to recommended range |
Lubrication extends bushing life on carts with grease fittings. Use a grease gun on any zerks present in the suspension system every 30 to 50 hours of operation. For carts without grease fittings, the bushings are sealed and self-lubricating. Refer to a golf cart maintenance checklist to track inspection intervals alongside other service items.
Proper suspension maintenance and upgrades contribute significantly to stability and handling on uneven terrain. Combining correct tire pressure, regular spring and shock inspection, and stable weight distribution produces the safest and most comfortable ride.
Stock suspension on most golf carts is designed for flat fairways and smooth paths. If you use your cart on hilly terrain, haul cargo, or carry four passengers regularly, aftermarket components deliver a measurable improvement.
Air suspension systems use air bladders and compressors, offering smoother rides and adjustable height. The ability to dial in ride height and stiffness from a switch is genuinely useful for carts that switch between terrain types. The tradeoff is cost and complexity. Air shocks require professional installation for most users and add electrical and pneumatic components that need their own maintenance.
Heavy-duty shocks and springs are the more practical upgrade for most owners. They increase load capacity, reduce bottoming out, and improve stability without requiring specialized installation skills. Brands like Monroe, Gabriel, and KYB make units compatible with EZGO, Club Car, and Yamaha platforms. These typically cost $60 to $120 per shock and install with the same tools you already have.
| Upgrade Type | Best For | Installation Difficulty | Relative Cost |
|---|---|---|---|
| Heavy-duty shocks | Cargo hauling, rough terrain | DIY-friendly | Moderate |
| Upgraded coil springs | Frequent overloading, sagging | DIY-friendly | Low to moderate |
| Air suspension kit | Variable terrain, ride height control | Professional recommended | High |
| OEM replacement parts | Restoring original ride quality | DIY-friendly | Low |
Pro Tip: If your cart is used primarily on a flat golf course or paved path, OEM replacement parts restore the original ride without the added complexity of aftermarket upgrades. Save the heavy-duty components for carts that genuinely work hard.
Adjusting golf cart suspension requires replacing worn springs first, torquing all bolts at ride height, and maintaining correct tire pressure to achieve lasting ride quality improvements.
| Point | Details |
|---|---|
| Springs before shocks | Replace sagging or broken springs before installing new shocks for any real improvement. |
| Torque at ride height | Always lower the cart to normal height before final torquing to prevent bushing bind. |
| Tire pressure first | Set PSI to 12 to 15 for street or 8 to 12 for off-road before adjusting any hardware. |
| Inspect on a schedule | Check bushings every two weeks for heavy use and every six months for standard use. |
| Upgrade strategically | Heavy-duty shocks suit working carts; air suspension suits variable terrain with professional help. |
Most owners I’ve seen come to suspension work with the wrong priority. They buy new shocks because the ride feels bouncy, install them over worn springs, and wonder why nothing changed. Springs are the foundation. If the foundation is compromised, no shock absorber in the world compensates for it. I’ve watched this mistake cost people two rounds of parts purchases when one would have done the job.
The other consistent error is torquing bolts with the suspension hanging free. It feels like the logical moment to tighten everything down. But rubber bushings twist under that tension and stay twisted, which means they’re already stressed before the cart moves an inch. Lower the cart first. Always. This one habit extends bushing life significantly.
Tire pressure is the most underused suspension tool available to any cart owner. I’ve seen a simple PSI adjustment transform a cart that felt like it was riding on concrete into something genuinely comfortable, at zero cost. Check it before you spend anything.
If you’re on the fence about DIY versus professional work, the honest answer is this: shock and spring replacement is well within reach for anyone comfortable with basic hand tools. Air suspension installation is not. Know where your skill set ends and call a technician for the pneumatic and electrical work. There’s no shame in it, and it’s far cheaper than fixing a mistake.
— Roshan

Getting the adjustment right starts with having quality parts on hand. Golfcartstuff carries suspension components for the most popular platforms, so you’re not hunting across multiple suppliers for a single bushing set. Whether you’re restoring a Club Car DS or upgrading an EZGO for off-road use, the right part makes the difference between a repair that lasts and one that fails in three months.
Browse Club Car DS suspension parts for shocks, springs, and bushing kits built to fit your model. If you run a Yamaha G-series, Golfcartstuff stocks Yamaha G-series components including suspension hardware specific to those platforms. EZGO owners can find EZGO suspension upgrades across the full accessories catalog. OEM-compatible parts ship fast, and the catalog is organized by model so you find the right fit without guesswork.
The bounce test involves pushing down firmly on each corner of the cart and counting how many times it bounces before settling. Healthy shocks settle after one or two bounces; more than that indicates worn dampers that need replacement.
Shock mounting bolts should be torqued to 25 to 35 ft-lbs using a calibrated torque wrench. Always torque with the cart lowered to normal ride height to prevent bushing bind and premature wear.
Inspect bushings every two weeks for carts in heavy use, and every six months or 500 hours for standard use. Early detection of wear prevents steering looseness and clunking from developing into a safety issue.
Yes, in some cases. Checking and correcting tire pressure, tightening loose hardware, and lubricating grease fittings can improve ride quality without any part replacement. If springs are sagging or shocks fail the bounce test, replacement is the only effective fix.
Air suspension systems require professional installation for most users because they involve both electrical and pneumatic components. Standard shock and spring replacement is a straightforward DIY task with basic hand tools.
Explore our store to see what our products and resources can do for you.

Leave a comment