


Your Cart Is Our Priority
Explore our store to see what our products and resources can do for you.

TL;DR:
- A golf cart sound system comprises a head unit, speakers, amplifier, and 12V power supply, designed for outdoor durability. Proper voltage conversion, weather-rated components, and correct wiring are essential for reliable, long-lasting performance. Upgrading with an external amplifier and marine-grade speakers significantly enhances audio quality while safeguarding your cart’s electrical system.
A golf cart sound system is a collection of audio components, including a head unit, speakers, amplifier, and dedicated power supply, installed to deliver music and entertainment while you ride. Getting these basics right determines whether your setup sounds great for years or fails after the first rainstorm. The core challenge for most owners is power management: standard 36V and 48V electric carts run far above the 12V that audio electronics require. This guide covers every foundational decision, from voltage conversion and wiring to speaker selection and mounting, so you build a system that performs and lasts.
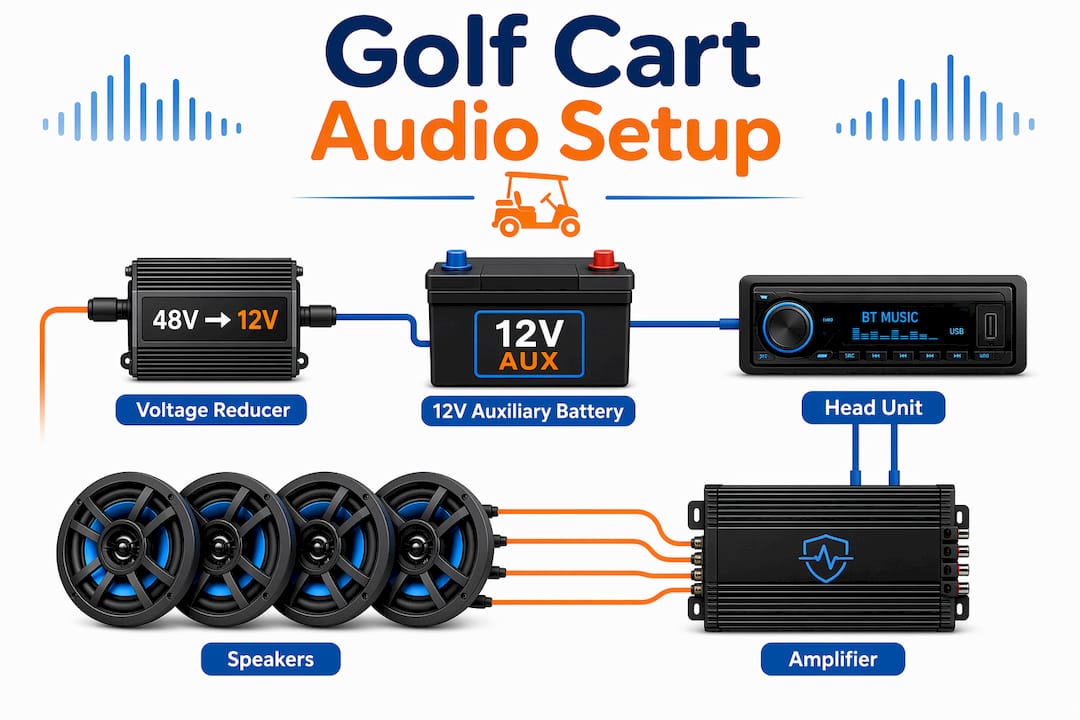
A golf cart audio setup has four core components, and each one affects the others. The head unit controls source selection, volume, and Bluetooth connectivity. Speakers convert electrical signals into sound. An amplifier boosts signal strength to drive speakers cleanly at higher volumes. The power supply, whether a voltage reducer or a dedicated auxiliary battery, feeds clean 12V power to every component.
Bluetooth connectivity is now considered a baseline feature rather than a premium add-on, and for good reason. Wireless streaming from your phone removes the need for aux cables and makes the system far easier to use while driving. Popular options range from all-in-one powered soundbars like those from Audioformz to component setups that pair a Fusion Apollo marine speaker array with a separate amplifier.
Compatibility with your cart’s electrical system is the factor most beginners overlook. Club Car, Yamaha, and EZGO carts each have different battery configurations and accessory wiring layouts. Knowing your cart’s voltage and available mounting points before you buy anything saves time, money, and frustration.
Most 36V and 48V electric golf carts require a 12V power solution for audio components, delivered either through a voltage reducer or a separate auxiliary battery. This single requirement shapes every other decision in your build. Skip the conversion step and you will destroy your stereo electronics within minutes of powering on.
A voltage reducer taps into the cart’s existing battery pack and steps the voltage down to a stable 12V output. This is the simpler and less expensive option, and it works well for low-to-moderate power systems. A dedicated 12V auxiliary battery is the better choice when you add amplifiers or subwoofers, because it isolates the audio circuit from the traction batteries and protects your cart’s range.
Proper wiring requires sizing wire gauge by amperage draw plus a 25 to 50 percent margin, measured over the full round-trip cable length. Undersized wire generates heat, causes voltage drop, and produces the kind of intermittent audio glitches that are nearly impossible to diagnose after the fact.
Fuse size should always be smaller than the wire’s ampacity so the fuse blows before the wire overheats. A fused 12V accessory bus fed by a main fuse, with individual branch fuses sized to each circuit’s wire, is the correct architecture. Correctly sized wiring and fusing prevent voltage drop, overheating, and the audio resets that frustrate owners who cut corners on this step.
| Power Setup | Best For | Trade-off |
|---|---|---|
| Voltage reducer | Basic head unit and speakers | Limited current output for high-wattage amps |
| Auxiliary 12V battery | Amplifiers and subwoofers | Adds weight and requires charging management |
| Fused accessory bus | All system types | Requires careful wire sizing and planning |
Pro Tip: Run your wiring before you mount any components. It is far easier to route cables through the frame and under panels when nothing is bolted in place yet.
Higher-wattage systems draw more current continuously, which reduces battery range on electric carts. A 200-watt amplifier running at moderate volume can noticeably shorten a round on a smaller battery pack. Plan your power budget before you commit to component choices.
The open-air environment of a golf cart is one of the harshest conditions any audio component can face. Sun, rain, dust, and vibration will destroy indoor-grade speakers within a season. Marine-grade speakers built with polypropylene cones and IP66 or IP67 ratings are the correct choice. They resist UV degradation, handle moisture, and maintain sound quality under continuous vibration.
The two main approaches to golf cart stereo options are all-in-one powered soundbars and separate component systems. Here is how they compare:
| Feature | All-in-one soundbar | Component system |
|---|---|---|
| Installation complexity | Low (under one hour) | Moderate to high |
| Sound quality ceiling | Good for casual listening | Excellent with proper tuning |
| Cost | Lower upfront | Higher, but scalable |
| Upgrade path | Limited | Add amp, sub, or speakers later |
| Weather resistance | Built-in enclosure | Depends on individual components |
All-in-one soundbars from brands like Audioformz mount directly to roof supports or the dash and connect to a single 12V power source. They are the right starting point for most owners. Component systems, which pair a head unit with separate marine speakers and an external amplifier, deliver better clarity and volume but require more planning and installation time.
External amplifiers improve sound clarity and volume by providing clean, dedicated power to each speaker channel, which reduces distortion at higher volumes. This matters most when you are riding at speed or in open areas where ambient noise competes with your music.
Key features to prioritize when selecting components:
Pro Tip: Check the IP rating on every component you buy, not just the speakers. Head units and amplifiers also need weather protection in an open cart.
Mounting location determines both sound quality and component longevity. The three most common locations are roof supports, the dash panel, and the area under or behind the rear seat. Roof support mounts project sound forward toward the occupants and keep electronics away from road splash. Dash-mounted units are convenient for controls but can receive direct sun exposure that degrades electronics over time.
Here is a practical installation sequence for a DIY golf cart sound system installation:
All-in-one powered soundbars commonly mount with simple brackets and connect to 12V power, making DIY installs feasible in under one hour. This is a meaningful advantage for owners who want results without a full day of work. Component systems with separate amplifiers and subwoofers require more time but follow the same logical sequence.
Pro Tip: Use split-loom tubing over every exposed wire run. It protects against abrasion from cart frame edges and makes the installation look professional.
Proper mount placement enhances bass response and prevents sound loss that occurs when speakers fire into open air at poor angles. Angling speakers slightly toward the seating area rather than straight forward makes a noticeable difference in perceived volume and clarity.
The most impactful single upgrade to an existing golf cart audio setup is adding an external amplifier. Adding audio amplifiers improves sound clarity and volume substantially, but also increases current draw on the cart’s electrical system. Before adding an amplifier, confirm your voltage reducer can handle the additional load or switch to a dedicated auxiliary battery.
Upgrade priorities in order of impact:
Amplifiers and subwoofers require extra power, and a dedicated 12V auxiliary battery is the recommended solution to avoid draining the main traction batteries. This is especially true on 36V carts with smaller battery packs, where audio draw can meaningfully reduce range per charge.
Maintenance extends system life significantly. Clean speaker grills monthly to remove pollen and debris. Inspect all wiring connections at the start of each season for corrosion, particularly at terminals near the battery. Apply dielectric grease to all exposed connectors to block moisture. A system that receives basic seasonal attention will outlast one that is ignored by several years.
Pro Tip: When upgrading, run a new dedicated wire from the power source to the amplifier rather than tapping into existing circuits. This prevents the voltage sag that causes distortion at high volume.
A properly planned golf cart sound system requires correct voltage conversion, weather-rated components, and dedicated wiring to deliver reliable performance and protect your cart’s batteries.
| Point | Details |
|---|---|
| Voltage conversion is non-negotiable | Use a voltage reducer or auxiliary battery to supply stable 12V power to all audio components. |
| Marine-grade components last | Choose speakers with IP66 or IP67 ratings and polypropylene cones to survive outdoor conditions. |
| Wire gauge and fusing protect the system | Size wire by amperage plus a 25 to 50 percent margin and always fuse below the wire’s ampacity. |
| Soundbars are the best starting point | All-in-one powered soundbars install in under one hour and suit most casual audio needs. |
| Upgrades require power planning | Adding amplifiers or subwoofers demands a dedicated auxiliary battery to protect cart range. |
The most common mistake I see is owners buying speakers and a head unit before they figure out power. They get everything wired up, flip the switch, and either nothing works or the stereo resets every time the cart accelerates. The fix is always the same: go back and sort out the 12V supply first. Voltage conversion is the foundation. Everything else is secondary.
I also think the industry undersells all-in-one soundbars for beginners. There is a tendency to assume that a component system with a separate amp and marine speakers is automatically better. For most golf cart owners riding 18 holes a few times a week, a quality soundbar from Audioformz delivers more than enough volume and clarity without the complexity. Save the component build for when you genuinely need more.
On marine-grade components: do not compromise here. I have seen owners buy indoor car audio speakers because they were cheaper, and those speakers are corroded and blown within one season. The price difference between a standard speaker and a Fusion Apollo marine unit is real money, but the lifespan difference is measured in years, not months.
One thing I wish more guides emphasized is future-proofing your wiring. When you run your initial cable, pull an extra run of heavier gauge wire alongside it. It costs almost nothing extra and means that when you decide to add an amplifier later, the wire is already there. Retrofitting wiring through a finished cart is the most frustrating part of any upgrade.
— Roshan
Golfcartstuff carries the parts you need to build or upgrade a golf cart sound system from the ground up. From voltage reducers that safely step down 36V and 48V systems to a full selection of waterproof speakers built for outdoor use, every component is sourced for compatibility with Club Car, Yamaha, and EZGO carts.

Whether you are starting with a simple soundbar install or building out a full component system with an amplifier and subwoofer, Golfcartstuff’s golf cart accessories catalog has the hardware, mounting kits, and wiring supplies to get the job done right. Shop by cart model to find parts confirmed to fit your specific vehicle.
A golf cart sound system includes a head unit, speakers, an amplifier, and a 12V power supply delivered through a voltage reducer or auxiliary battery. These four components work together to produce reliable audio in an open-air, weather-exposed environment.
Yes. Most 36V and 48V electric golf carts require a voltage reducer or dedicated 12V auxiliary battery to power audio components safely. Connecting a 12V stereo directly to a higher-voltage system will destroy the electronics immediately.
Marine-grade speakers with IP66 or IP67 ratings and polypropylene cones are the best choice for golf carts. Brands like Fusion Apollo build speakers specifically for outdoor and marine environments where moisture, UV exposure, and vibration are constant factors.
An all-in-one powered soundbar installs in under one hour for most DIY owners. A full component system with a separate amplifier, subwoofer, and dedicated auxiliary battery typically takes three to five hours depending on the cart model and wiring complexity.
Adding an external amplifier to your existing speakers is the single most impactful upgrade for sound clarity and volume. If your current setup uses a voltage reducer, verify it can handle the additional current draw before connecting the amplifier, or add a dedicated 12V auxiliary battery to the circuit.
Explore our store to see what our products and resources can do for you.

Leave a comment