

Your Cart Is Our Priority
Explore our store to see what our products and resources can do for you.

You can replace EZGO, Club Car, or Yamaha golf cart seat covers in eight clear steps using marine-grade materials and common shop tools. The full process runs from removal and measurement through pattern making, cutting, sewing, attachment, foam work, reinstallation, and a final safety check. Budget a moderate amount of time per seat for a cover-only swap, or several hours when you’re also replacing foam and sewing custom covers from scratch. Materials for a single seat typically run $20–$60 depending on whether you use pre-sewn covers or cut your own from marine vinyl with UV-resistant polyester thread. Golfcartstuff carries seat cover kits for all three brands if you’d rather skip the sewing entirely.
The eight steps at a glance:
A good pattern with the correct wrap allowance is the single most important factor in a clean, wrinkle-free golf cart seat cover replacement.
| Point | Details |
|---|---|
| Eight-step process | Remove, measure, pattern, cut, sew, attach, replace foam if needed, reinstall. |
| Time range | 5 minutes for slip-on covers; 2–4 hours for custom sewn covers with foam replacement. |
| Machine setup matters | Use leather needles, UV-resistant polyester thread, and a longer stitch length than standard fabric. |
| Attachment method choice | Elastic or hook-and-loop for removability; staples or hog rings for permanent, heavy-use installs. |
| Golfcartstuff kits | Pre-sewn marine-grade covers for EZGO, Club Car, and Yamaha available for fast installs or full DIY kits. |
Get everything on this list before you touch the seat. Running out of staples mid-install is how you end up with a half-finished seat in the garage for two weeks.
Materials:
Tools:
Sailrite’s reupholstery guide also recommends a staple remover, flat-head screwdriver, and a clean flat work surface as non-negotiables.
Pro Tip: If you’re only doing one or two seats, renting a walking-foot industrial machine from a local fabric or upholstery shop costs far less than buying one. Marine vinyl is too thick for most home sewing machines, and forcing it through the wrong machine leaves skipped stitches and broken needles.
Remove the seat board and cushions before you measure anything. Eyeballing dimensions while the seat is still bolted in leads to patterns that are off by half an inch, and half an inch in vinyl means puckering or a cover that won’t close.
Measurements to capture:
Sketch a simple labeled diagram as you go. You’ll refer to it constantly during pattern making, and it’s the fastest way to catch asymmetry before you’ve cut any vinyl.
Pick your method based on seat shape. Flat seat bottoms work fine with kraft paper. Contoured seats, especially the curved backs on Club Car Precedent and Yamaha Drive models, need the duct-tape method to capture the curves accurately.
Paper-template method (flat seats):
Duct-tape method (contoured seats):
For contoured seats, the duct-tape method captures complex curves far better than flat paper, as noted in the complete DIY guide from Marine Vinyl Fabric.
Pro Tip: Before cutting into your good vinyl, sew a quick mock-up in cheap muslin or canvas. A 20-minute test fit saves you from discovering a pattern error after you’ve cut $40 worth of marine vinyl.
Let rolled vinyl relax flat for at least 24 hours before cutting. Cold or tightly rolled vinyl springs back and shifts under the blade, which throws off your cut lines.
Pro Tip: Wear cut-resistant gloves when using a rotary cutter on a hard surface. The blade skips on vinyl more than on fabric, and a skipped cut goes wherever it wants.
Set up for vinyl before you touch the actual cover pieces. Needle holes in marine vinyl are permanent, so a wrong setting discovered mid-seam means you’re cutting new pieces.
| Setting | Recommendation |
|---|---|
| Needle type | Leather or denim, size 18–20 |
| Thread | UV-resistant polyester |
| Stitch length | Longer stitch length than standard fabric |
| Presser-foot pressure | Reduced (lighten until vinyl feeds without dragging) |
| Tension | Test on scrap; slightly looser than standard |
These settings come directly from marine vinyl sewing guidance for golf cart upholstery work.
Pro Tip: Always test seam strength by pulling the scrap seam firmly before moving to the real cover. A seam that looks fine but separates under light tension means your thread tension or stitch length needs adjustment.
Your choice here depends on one question: does the cover need to come off again? Dealers who swap covers between seasons or for resale want removability. Permanent installs prioritize durability.
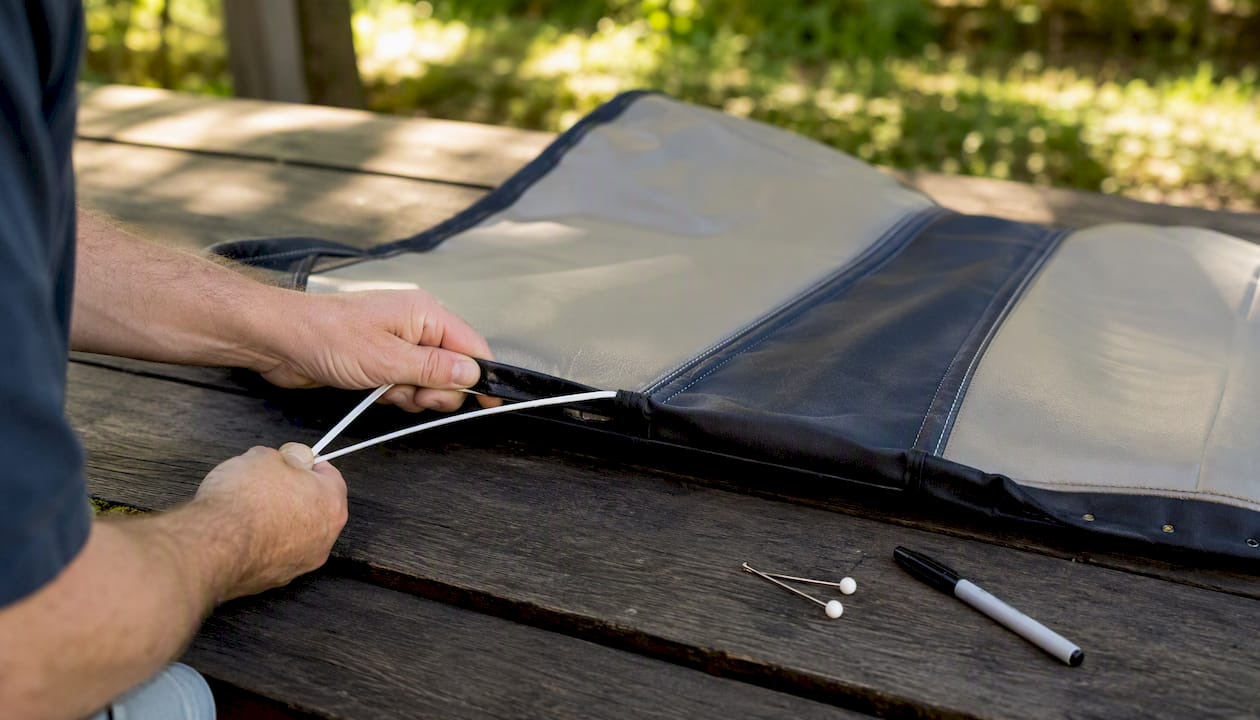
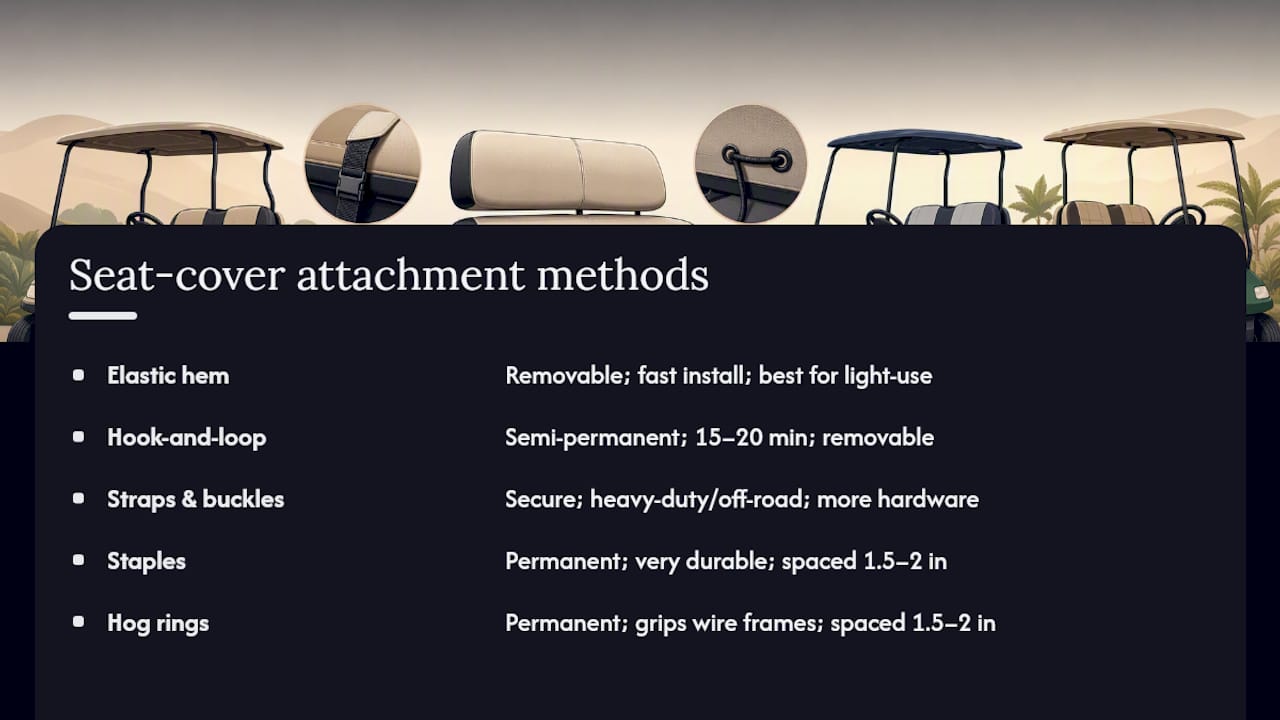
Elastic hem works for slip-on covers. Sew a channel around the bottom edge, thread elastic through, and the cover stretches over the foam and grips the seat board. Fast to install, easy to remove, and no tools needed after the initial sew. Best for light-use carts.
Hook-and-loop (Velcro-style) is semi-permanent. Sew the loop side to the cover hem, staple or glue the hook side to the seat board edge. Takes 15–20 minutes to install and comes off cleanly for cleaning or replacement.
Straps and buckles suit heavy-duty or off-road carts where vibration would loosen an elastic hem. Route straps under the seat board and buckle them snug. More hardware, but nothing shifts.
Staples and hog rings are the permanent choice. Staple from the center outward, alternating sides to maintain even tension across the cover. Space staples every 1.5–2 inches. Hog rings work the same way but grip a wire frame rather than a wood or plastic board.
When stapling, keep the staple gun perpendicular to the board edge and avoid driving staples through the foam itself. Staples through foam compress it unevenly and create lumps you’ll feel every ride.
Replace foam when it’s compressed flat, torn, or when the new cover fits poorly over the old shape. New foam dramatically improves both comfort and how cleanly the cover sits.
Allow full cure before stretching the cover over the foam, typically 2–4 hours for most contact cements. Rushing the cure causes the foam to shift inside the cover.
Pro Tip: An electric foam cutter gives you a cleaner edge than any hand tool. If you’re cutting multiple seats, the $30–$50 investment pays for itself in time and material saved.
Use the photos and labels you took during removal. This is exactly why you took them.
Reconnect the battery last, after all hardware is confirmed secure.
Clean quarterly and deep-protect annually. Marine vinyl holds up well when it’s maintained; neglect it and the UV degradation shows within a season.
Golfcarts recommends heat-assisted fitting during installation and confirms that mild detergent with annual UV protection is the right maintenance approach. A dedicated golf cart upholstery cleaning guide from Golfcartstuff covers product-specific recommendations in more detail.
Wrinkles or puckering after installation: The cover is either too loose or the foam shape doesn’t match the pattern. Re-tension by pulling the cover tighter on the problem side and re-stapling. If the wrinkle runs along a seam, the seam allowance may be inconsistent; add a dart to take in the excess.
Loose seams pulling apart: Thread tension was too tight or stitch length too short for vinyl. Remove the affected seam with a seam ripper, re-sew with a longer stitch and slightly looser tension, and test on scrap first.
Cover won’t close over the foam: Foam is cut too large or the pattern didn’t account for foam thickness. Trim the foam edges by 1/4" at a time until the cover closes without excessive tension.
Asymmetric fit (one side tight, one side loose): The pattern was traced off-center or the vinyl shifted during cutting. Check the pattern against the seat and re-cut the problem piece.
Realistic time and cost depend on which type of install you’re doing.
Time estimates for slip-on, hook-and-loop, and stapled installs are drawn from documented install data across common cover types.
When DIY makes sense:
When to order pre-sewn kits instead:
For a deeper look at custom seat advantages, Golfcartstuff’s guide breaks down when custom sewn covers outperform pre-made options for both owners and dealers.
Most guides frame this as a sewing project. It isn’t, really. The sewing is the easy part once you have a good pattern. The part that trips people up is the pattern itself, specifically the wrap allowance and how it interacts with foam thickness.
A 2" wrap allowance sounds like a lot until you’re pulling vinyl over a 3" foam cushion and realize the cover is 1/4" short on every side. The foam thickness eats into your wrap, and if you didn’t account for it in the pattern, you’re cutting new pieces.
The other thing dealers get wrong: they skip the test fit in muslin or cheap fabric because it feels like extra work. Then they cut $60 of marine vinyl and discover the pattern is off-center. One test fit in canvas costs maybe $3 in material and 20 minutes. It’s not optional on a first build.
The attachment method decision also matters more than most people realize. Elastic hems look clean and feel easy, but they loosen over time on carts that see rough terrain or heavy daily use. If you’re outfitting a fleet or a cart that runs 20+ hours a week, staples or hog rings are the right call even though they’re permanent.
Skip the fabric store sourcing and get covers built specifically for your cart. Golfcartstuff carries USA-made marine-grade seat covers for EZGO, Club Car, and Yamaha in slip-on, pre-sewn vinyl, and full sew kit formats, plus replacement foam and accessories.
For EZGO TXT owners, the EZGO TXT parts collection includes seat hardware and cover kits matched to your model. Club Car owners can find covers and seat components in the Club Car DS parts collection, and Yamaha G1–G22 owners have a dedicated Yamaha parts collection with compatible options. If your seat board or hinge hardware is damaged beyond a cover swap, a professional upholsterer is the right call before ordering new covers. Browse the full seat cover catalog at Golfcartstuff and order the kit that matches your cart and your timeline.
Explore our store to see what our products and resources can do for you.

Leave a comment