


Your Cart Is Our Priority
Explore our store to see what our products and resources can do for you.

TL;DR:
- Most golf cart electrical failures are caused by overlooked wiring harness components, which organize circuits and prevent shorts. Proper installation, high-quality connectors, and individual fusing are essential for safe, reliable upgrades and troubleshooting. Using OEM parts and following detailed wiring diagrams helps prevent costly faults and enhances overall system safety.
Most golf cart electrical failures trace back to one overlooked component: the wiring harness. Whether your cart suddenly loses power to accessories, throws a strange electrical fault, or shows signs of a short circuit, explaining golf cart wiring harness function is often the missing piece for DIY owners. This guide walks you through what a wiring harness actually is, how to install or replace one safely, how to troubleshoot common faults, and how to upgrade your system without turning it into a tangled mess. If you’ve ever stared under your cart’s dash feeling completely lost, this is for you.
| Point | Details |
|---|---|
| Harness is the backbone | The wiring harness organizes every electrical circuit on your cart into protected, manageable pathways. |
| Know your voltage systems | Golf carts run both high-voltage (36V, 48V) and low-voltage (12V) circuits that must be kept separate. |
| Wire gauge is non-negotiable | Always match wire gauge to the amperage load and fuse rating to prevent overheating and fire. |
| Connector quality matters | Sealed, automotive-grade connectors prevent moisture faults that generic connectors routinely miss. |
| Plan before you upgrade | Adding accessories without a dedicated fuse block creates overloaded circuits that are brutal to diagnose later. |
Think of the wiring harness as your cart’s nervous system. It bundles wires into organized pathways to reduce complexity, prevent shorts, and make repairs far more manageable. Without it, you’d have hundreds of individual wires running in every direction with zero protection against vibration, moisture, or abrasion.
A golf cart wiring harness includes four main elements:
Golf carts run two distinct electrical systems, and understanding wiring harness design means understanding both. The high-voltage system powers the drive motor and typically operates at 36V, 48V, or even 72V on performance models. The low-voltage system, usually 12V, powers accessories like lights, radios, and USB outlets. This 12V system gets its power through a voltage reducer that steps down the main pack voltage. According to market data, low-voltage systems below 50V are growing at a 22% CAGR through 2034, driven by the surge in electric vehicle accessory demand.
Wire gauge matters more than most DIYers realize. Thicker wires carry more current safely. A wire that’s too thin for the load it’s carrying will heat up, degrade the insulation, and eventually cause a short or fire. Manufacturer wiring gauge and insulation specs directly affect long-term reliability and the risk of dielectric breakdown. Always check your cart’s service manual before swapping any wire.
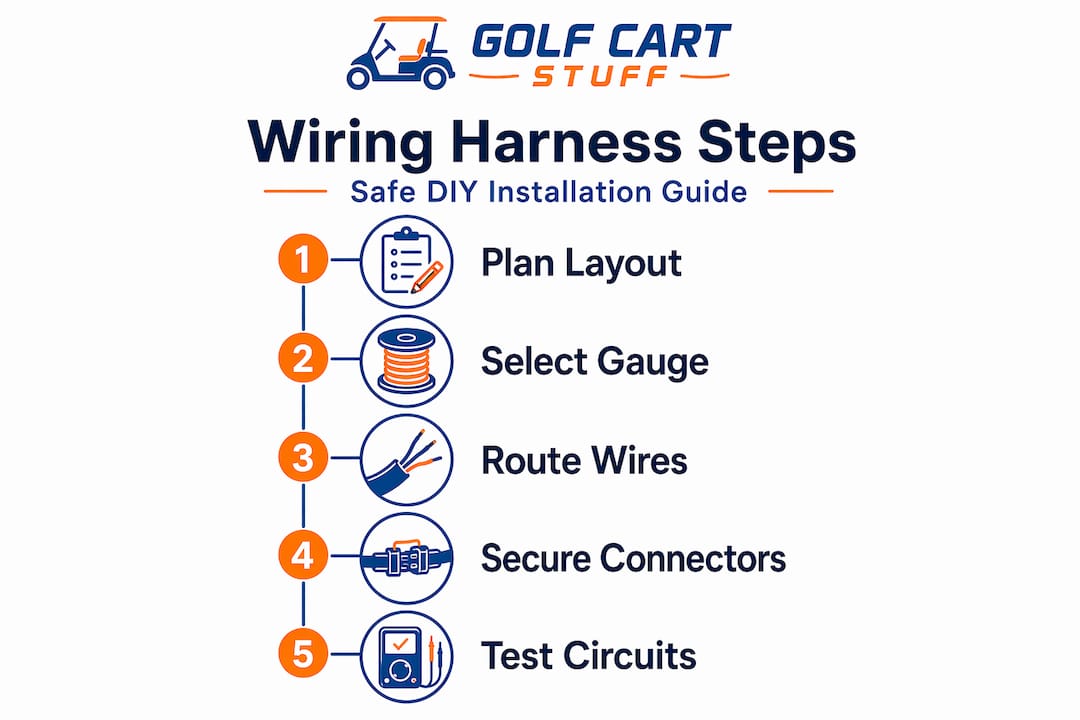
Installing or replacing a wiring harness is one of the most satisfying DIY projects you can do on a golf cart, but only if you follow the right sequence. Rushing it or skipping steps is how you end up with a cart that randomly shuts off during a round.
Fire risk from poor wiring is real and serious. A May 2026 golf cart fire required 400 gallons of water to extinguish, a stark reminder of what damaged or improperly installed wiring can lead to.
Pro Tip: Always use heat-shrink tubing over your connections instead of electrical tape. Tape loosens over time, especially in heat. Heat-shrink creates a sealed, permanent bond that won’t unravel.
Also, keep 12V wires separated from high-voltage battery cables by a few inches. Running them side by side causes electromagnetic interference that shows up as LED flickering or radio static.
Wiring faults rarely announce themselves cleanly. They tend to show up as ghost problems: accessories that work sometimes but not always, lights that flicker under load, or a cart that starts cutting out after 20 minutes of use. Troubleshooting golf cart wiring gets much easier once you know where to look first.
Common symptoms and their likely causes:
The tools you need for diagnosing wiring faults are simple: a digital multimeter, a wiring diagram for your specific model and year, and a set of spare connectors in common sizes. Sealed connectors like Deutsch or Weather-Pack resist moisture, dust, and vibration far better than standard open-barrel connectors. If you’re replacing a failed connector, upgrade to a sealed version while you’re in there.
When deciding whether to repair or replace a section of harness, use this rule: if more than 30% of a harness run shows damage, replace the whole section. Patching multiple spots in the same area creates a reliability problem that will come back to haunt you.
Pro Tip: Before chasing a mysterious electrical fault, check the golf cart electrical basics for your model. Many “hard to find” faults are actually well-documented issues with specific connectors on specific models.
Adding accessories to your golf cart is where things get either really clean or really chaotic. Lights, USB ports, Bluetooth speakers, rear-view cameras, and GPS units all draw power. Without a plan, you end up with overloaded circuits and complex wiring that becomes nearly impossible to diagnose when something fails.
Here’s a comparison of common upgrade approaches:
| Approach | Pros | Cons |
|---|---|---|
| Tapping into existing circuits | Fast and simple | Overloads existing fuses, causes faults |
| Dedicated fuse block with relays | Clean, scalable, easy to troubleshoot | Requires more planning and wiring time |
| Relay-switched accessory block | Protects main harness, controlled by ignition | Slightly more complex to install |
| OEM harness extension kits | Plug-and-play compatibility | Limited to available accessory options |
The dedicated fuse block approach wins every time for anything beyond a single light kit. Each accessory gets its own fused circuit, which means a blown fuse on your radio doesn’t kill your headlights.
Brand-specific notes matter here too. EZGO carts often have the main harness running along the driver-side frame rail, making it easy to access for additional runs. Club Car DS models have a known routing path under the front cowl that makes accessory wiring relatively straightforward. Yamaha G-series carts tend to have tighter routing channels, so plan your wire paths carefully before you start pulling wire.
Pro Tip: Always fuse each accessory circuit individually, right at the fuse block. The fuse must blow before the wire overheats. If a single fuse protects multiple circuits, it likely won’t blow in time to protect the wiring.
For lighting upgrades specifically, understanding how golf cart light relays function will save you a lot of troubleshooting time. Relays let you switch high-current loads cleanly without running heavy wire all the way to a small switch.
I’ve worked through enough golf cart wiring projects to know where things go wrong, and it almost always comes down to two things: connector quality and patience.
Most DIYers focus on the wire itself and completely ignore the connector. I’ve seen carts with perfectly sized wire gauges running through generic, unprotected connectors that fail within a single season. Connector quality is consistently undervalued in the DIY world, and it shows up in the form of frustrating intermittent faults that take hours to track down.
My other honest observation: people skip the wiring diagram. Every cart brand publishes service documentation. Using it isn’t a sign you don’t know what you’re doing. It’s how you avoid replacing a perfectly good component because you misread the circuit.
The shortcuts that cost the most aren’t skipping steps. They’re using cheap materials with the logic that “it’s just a golf cart.” A cart fire destroys property and creates real safety hazards. The difference between a solid wiring job and a liability is about $20 in quality connectors and heat-shrink. Spend the money. Take the time. Do it once, and do it right.
— Roshan
If you’re ready to replace your wiring harness or build out a clean accessory setup, having the right parts makes all the difference.

Golfcartstuff stocks OEM and aftermarket wiring components, voltage reducers, fuse blocks, and connectors for all major cart brands. Whether you’re working on a Club Car DS, an EZGO model, or a Yamaha G-series, you’ll find brand-compatible parts built for reliable performance. Browse the full golf cart accessories catalog to find voltage reducers, relay blocks, and wiring upgrade kits. When you use quality components from the start, the install goes smoother and the cart runs reliably for years.
A wiring harness organizes all electrical wires into protected, routed bundles that connect your cart’s power source to every component. It prevents shorts, simplifies repairs, and protects wiring from heat, vibration, and moisture.
Use a minimum of 10 AWG wire for the main feed from the battery pack to the voltage reducer. The fuse rating must match the wire’s amperage rating so the fuse blows before the wire can overheat.
Common signs include intermittent accessory operation, repeated blown fuses, flickering lights, burning smells near the dash, and visible corrosion or chafing on wire insulation. A digital multimeter helps confirm continuity faults.
Yes, but add a dedicated fuse block and voltage reducer to handle the additional load. Tapping directly into existing circuits without proper fusing overloads the harness and creates hard-to-trace electrical faults.
Sealed automotive-grade connectors like Deutsch or Weather-Pack offer the best protection against moisture, dust, and vibration. Generic connectors fail faster in outdoor environments and are a leading cause of intermittent electrical faults.
Explore our store to see what our products and resources can do for you.

Leave a comment