


Your Cart Is Our Priority
Explore our store to see what our products and resources can do for you.

You flip the switch, but your golf cart lights flicker or don’t turn on at all. The battery is charged, the bulbs are new, yet something still isn’t right. Often, the culprit isn’t the lights themselves but a faulty or improperly wired relay. Understanding how golf cart light relays function can save you hours of frustration and prevent unsafe nighttime driving. This guide walks you through what relays are, how to wire them correctly, troubleshooting methods, and advanced tips to keep your cart’s lighting system running smoothly.
| Point | Details |
|---|---|
| Relay function basics | Relays act as electrically operated switches that let a small trigger current control a much larger lighting circuit, protecting switches and improving reliability. |
| Wiring and fusing best practices | Wire the relay pin 30 to a fused positive supply, pin 85 to ground, pin 86 to the ignition trigger, and pin 87 to the light, with the fuse placed near the power source. |
| Testing and troubleshooting steps | After wiring, test the relay with a multimeter to confirm coil activation and verify continuity in the load circuit to ensure proper operation. |
| High voltage considerations | For 48V golf carts use a voltage reducer or a high voltage rated relay and include protective diodes to guard against voltage spikes. |
A relay is an electrically operated switch that lets a small current control a much larger current. In golf cart lighting, relays protect your dashboard switches from handling the full power load required by headlights, taillights, or LED light bars. Instead of routing 10 or 15 amps through a delicate toggle switch, you send a tiny trigger signal through the relay coil, which then closes heavy duty contacts to power your lights.
Most standard automotive relays use a four or five pin configuration. Pins 85 and 86 form the coil circuit, which activates the relay when energized. Pin 30 connects to your power source, typically 12V from the battery or a voltage reducer. Pin 87 delivers power to your lights when the relay closes. Some relays include pin 87a for normally closed circuits, but most golf cart lighting uses the normally open 87 connection.
Why bother with relays at all? Three major benefits stand out:
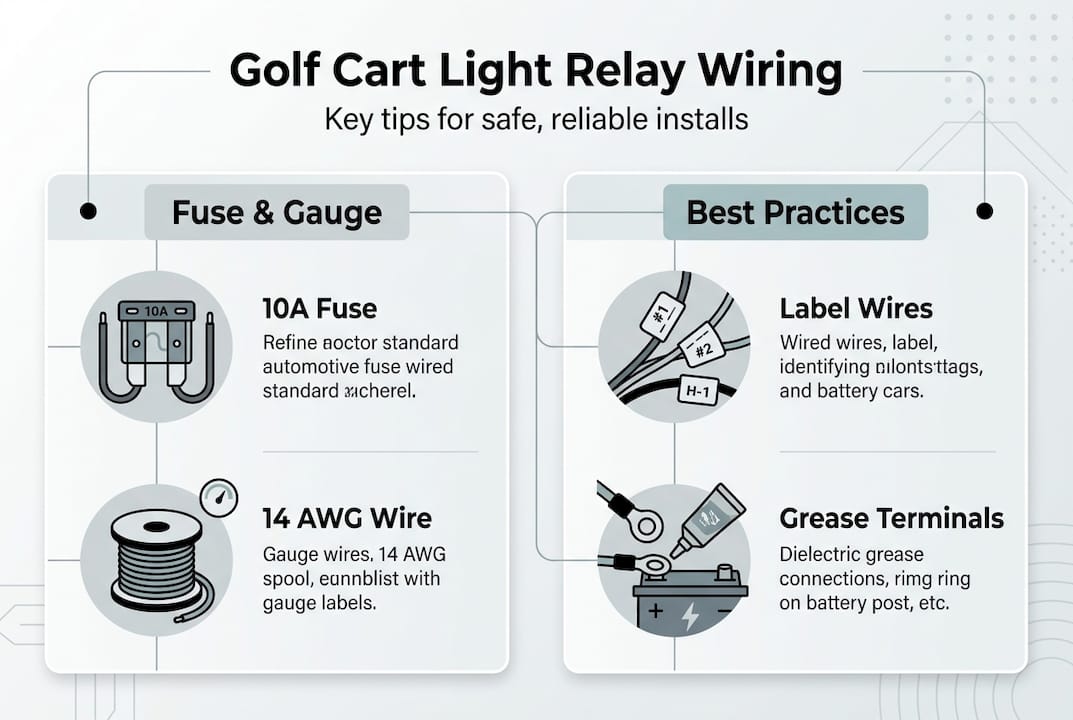
Pro Tip: Apply a small amount of dielectric grease to each relay terminal before inserting connectors. This prevents corrosion in humid environments and ensures solid electrical contact for years.
Wiring a relay might seem intimidating, but following these steps ensures a safe, reliable connection every time. Proper technique prevents the most common lighting failures and protects your cart’s electrical system from damage.
Fuse selection matters as much as wire gauge. A 10 to 15 amp fuse protects most golf cart lighting circuits without nuisance blowing. Place it within six inches of your battery or power source to safeguard the entire run. For 48V golf cart systems, you’ll need a voltage reducer before the relay unless using specialized 48V relays.
| Wire gauge | Maximum run length | Fuse rating | Best for |
|---|---|---|---|
| 14 AWG | 10 feet | 15 amp | Standard headlight pairs, small LED bars |
| 12 AWG | 15 feet | 20 amp | Large LED bars, multiple light circuits |
| 10 AWG | 20 feet | 30 amp | Heavy duty lighting, multiple high draw accessories |
Pro Tip: Label each wire at both ends with masking tape and a marker before making connections. This simple step prevents confusion during installation and makes future troubleshooting effortless.
Once wired, testing confirms your relay operates correctly before you button everything up. A multimeter and your ears are the only tools you need for basic diagnostics. These checks catch 90% of relay issues before they strand you in the dark.
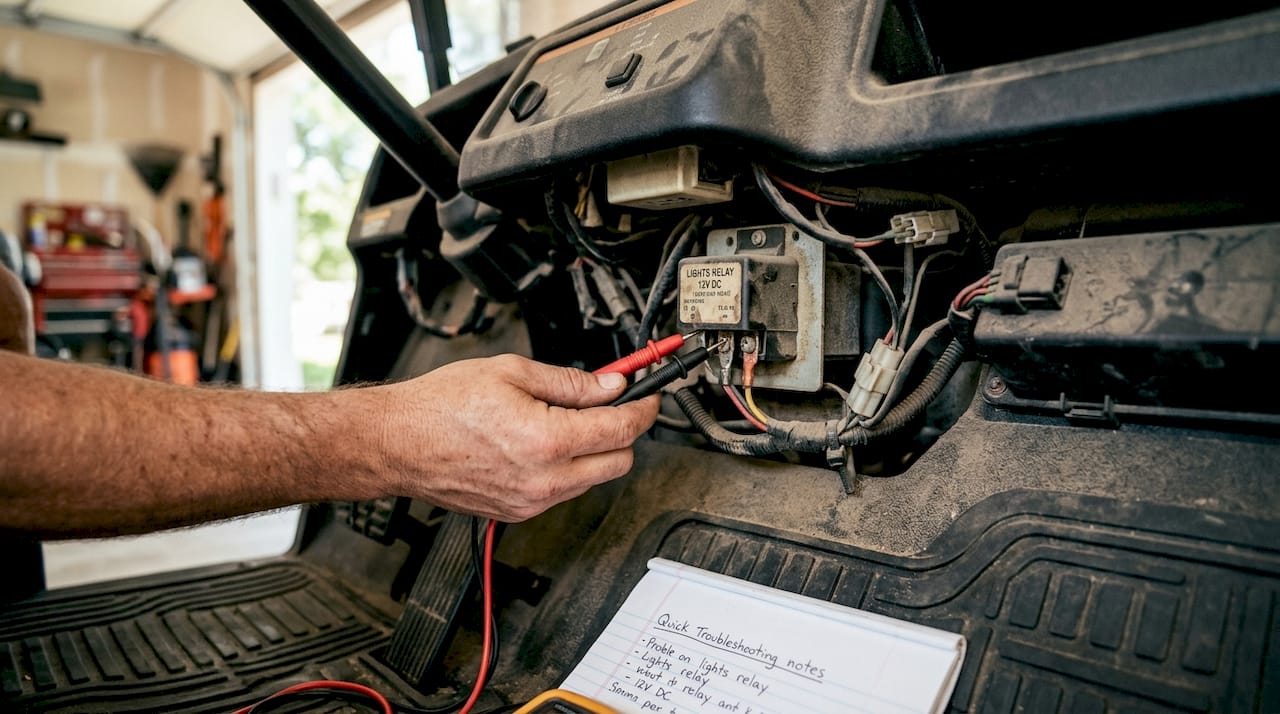
Start by energizing pins 85 and 86 with 12V and ground. You should hear a distinct click as the relay armature moves. No click usually means a bad coil or insufficient voltage reaching pin 86. Next, use your multimeter in continuity mode to check pins 30 and 87 while the relay is energized. You should see near zero resistance, confirming the contacts closed properly.
Common relay related lighting issues include:
When troubleshooting, work systematically. First, verify 12V reaches pin 86 when your light switch is on. Then check pin 85 has a solid ground connection. If both check out but the relay won’t click, replace it. If the relay clicks but lights don’t work, test for 12V at pin 87 with the relay energized. No voltage there means internal contact failure.
High voltage setups require extra caution. If you’ve wired lights directly to 48V without a reducer, standard 12V relays will fail quickly or create dangerous arcing. Always match relay voltage ratings to your system and consider adding protective diodes across the coil in 48V applications.
For a comprehensive look at other common golf cart light problems, including switch and wiring issues beyond relays, check additional troubleshooting resources.
Once you’ve mastered basic relay installation, several advanced techniques can improve reliability and prepare your cart for future upgrades. These considerations become especially important when adding high powered LED bars or custom lighting packages.
Custom high voltage lighting presents unique challenges. Running lights directly from 48V requires specialized relays and protective diodes across the coil to prevent voltage spikes from damaging your cart’s controller. Standard automotive relays aren’t rated for this voltage and will arc internally, creating radio interference and eventual failure. The diode acts as a snubber, absorbing the inductive kickback when the relay coil de energizes.
| Feature | Standard 12V relay | 48V relay with diode |
|---|---|---|
| Coil voltage | 12V DC | 48V DC |
| Contact rating | 30-40 amp | 20-30 amp |
| Diode protection | Not required | Essential across coil |
| Typical cost | $8-12 | $25-40 |
| Best application | Voltage reducer powered lights | Direct high voltage lighting |
Wiring harness routing deserves careful attention even after initial installation. Follow these best practices:
Pro Tip: Inspect relay terminals and connections every six months, cleaning any corrosion with electrical contact cleaner and reapplying dielectric grease. This five minute maintenance task prevents 80% of relay failures.
Some newer gas carts, like the EZGO EX1 models, include prewired accessory relay sockets that simplify installations. These factory provisions provide switched power and proper fusing, eliminating much of the custom wiring work. Check your owner’s manual for accessory circuits before running new wires.
Understanding the differences between 36V and 48V battery setups helps you plan lighting upgrades that match your cart’s electrical architecture. Higher voltage systems offer more power but require careful component selection to avoid compatibility issues.
Now that you understand golf cart light relays inside and out, finding quality parts and staying current with maintenance best practices becomes your next priority. GolfCartStuff.com offers a comprehensive selection of relays, lighting components, and electrical accessories designed specifically for golf cart applications. Their inventory includes both standard 12V relays and specialized high voltage options for custom builds.

Beyond parts, the site maintains an extensive library of how to guides covering everything from basic maintenance to complex electrical upgrades. If you’re tackling other electrical issues, their motor troubleshooting guide complements relay knowledge by helping you diagnose power delivery problems throughout your cart’s system. Access to expert advice and a supportive community makes ongoing maintenance and upgrades far less intimidating, whether you’re wiring your first relay or planning a complete lighting overhaul.
Signs include no clicking sound when you flip the light switch, flickering lights during operation, or complete light failure despite having power at the battery. Use a multimeter to test for voltage at the relay coil and continuity through the contacts. If the relay clicks but lights don’t work, internal contacts have likely burned out and the relay needs replacement.
No, standard 12V relays aren’t designed for 48V systems and will fail quickly or create dangerous arcing. Use voltage matched relays and add protective diodes across the coil to prevent controller damage from inductive kickback. Improper relay selection risks electrical fires and expensive controller repairs.
Most golf cart lighting circuits work well with a 10 to 15 amp fuse placed within six inches of the battery or power source. The exact rating depends on your wire gauge and total light load. Calculate total amperage by dividing your lights’ wattage by 12, then add 20% for safety margin.
While LEDs draw less current than halogen bulbs, relays still provide benefits for any lighting upgrade. They reduce voltage drop over long wire runs, protect dashboard switches from wear, and simplify troubleshooting. The small cost of a relay prevents future headaches and improves overall system reliability.
Mount relays in a protected location away from direct water spray, road debris, and excessive heat. Under the dash near the steering column or in the battery compartment work well for most carts. Use the relay’s mounting tab and a sheet metal screw, ensuring the location allows easy access for future testing or replacement.
Explore our store to see what our products and resources can do for you.

Leave a comment