


Your Cart Is Our Priority
Explore our store to see what our products and resources can do for you.

Most golf cart owners assume a dash kit is purely a cosmetic swap, something you do to make your cart look sharper at the clubhouse. That assumption sells these upgrades way short. A quality dash kit does improve the look of your interior, but it also adds storage, creates mounting points for electronics, and serves as the foundation for further mods like battery meters or audio systems. This guide breaks down exactly what dash kits are, what materials and designs to consider, how to install one without headaches, and what upgrades become possible once your new dash is in place.
| Point | Details |
|---|---|
| Dash kits add value | Golf cart dash kits enhance both appearance and functionality, making them a smart upgrade. |
| Material matters | Choosing the right dash kit material affects durability, cost, and long-term satisfaction. |
| Installation is approachable | Most dash kits can be installed by owners with basic tools and attention to detail. |
| Unlock future upgrades | A dash kit lays the groundwork for adding accessories like meters, speakers, or storage. |
A golf cart dash kit is a replacement or overlay panel system designed to upgrade the front interior of your cart. It replaces or covers the factory dashboard with a cleaner, more functional surface. Think of it as a renovation for the command center of your cart, trading a plain molded plastic face for something that actually works harder for you.
Customizing golf cart interiors has grown significantly in popularity because owners want their carts to reflect their style while also being more practical. A dash kit is usually the first and most impactful interior upgrade you can make.
Common components included in a dash kit:
Not all kits are created equal. Standard kits focus on basic panel replacement, while custom kits offer more features and a higher-end finish. Here’s a quick comparison:
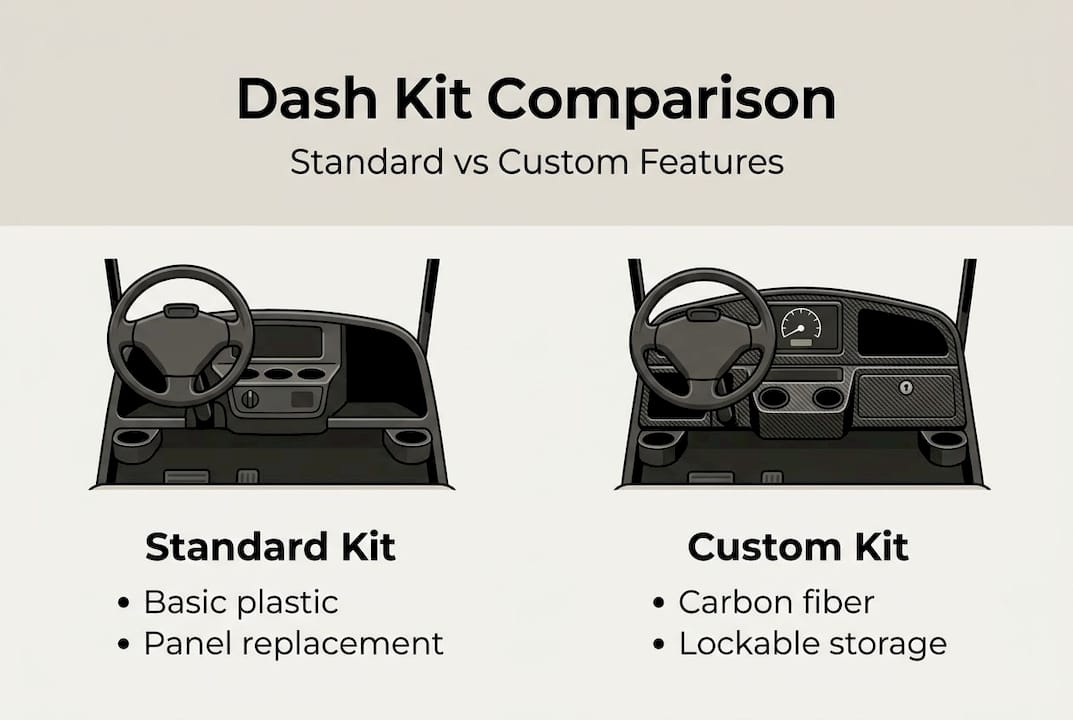
| Feature | Standard dash kit | Custom dash kit |
|---|---|---|
| Material quality | Basic ABS plastic | Carbon fiber, wood grain, or premium plastic |
| Storage options | Minimal | Multiple pockets and compartments |
| Accessory mounts | Few or none | Pre-drilled for meters, switches, audio |
| Installation ease | Simple bolt-on | May require minor fitting adjustments |
| Price range | Budget-friendly | Mid to premium range |
The aesthetic upgrades and extra storage options that come with a well-chosen dash kit make it one of the highest-value upgrades per dollar spent. Beyond looks, you gain real organizational benefits. Keys, scorecards, snacks, and your phone all need a home when you’re out on the course or cruising the neighborhood.
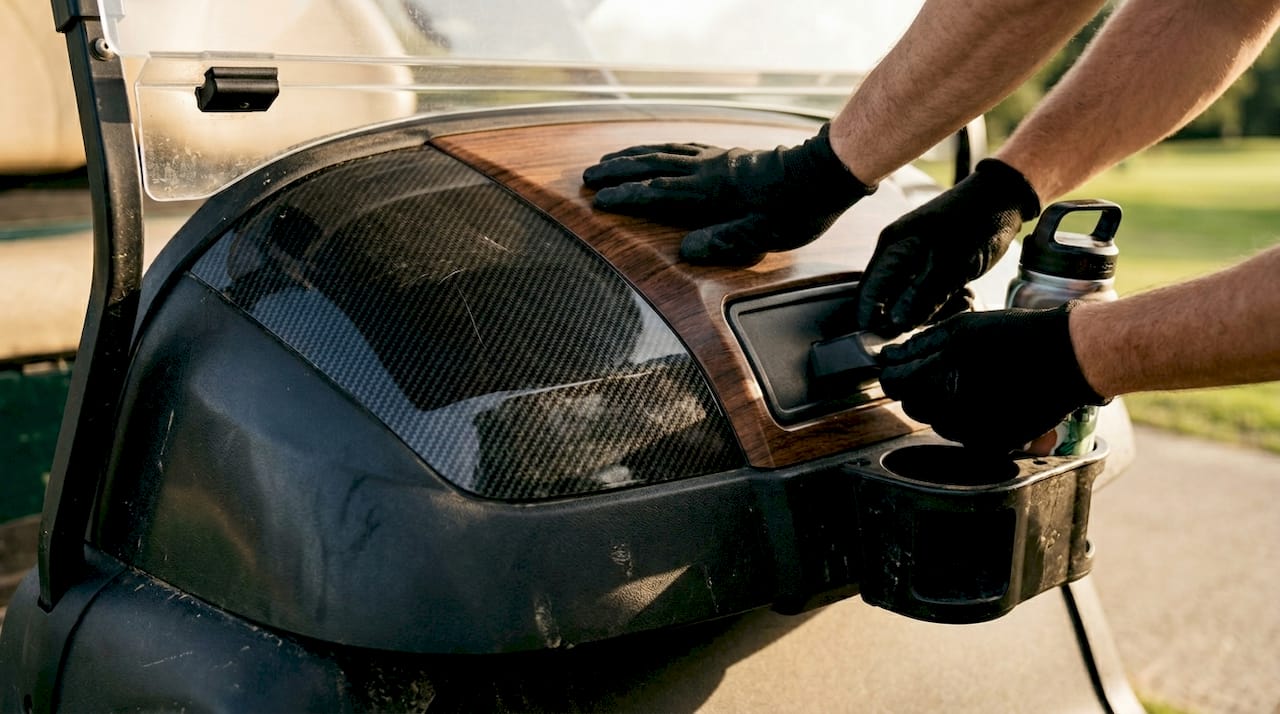
Security is another underrated benefit. Some custom dash kits include lockable storage compartments, which is genuinely useful if you leave your cart parked at a community or resort.
With a clear understanding of dash kit basics, the next step is choosing the right materials and design for your cart and lifestyle. The material you choose affects how your dash looks, how long it lasts, and how well it holds up in your specific environment.
Modern dash kits use materials like carbon fiber, wood grain, and marine-grade plastics that balance durability with visual appeal. Each material has its own strengths depending on your priorities.
| Material | Appearance | Durability | Cost | Best for |
|---|---|---|---|---|
| ABS plastic | Clean, basic | Good | Low | Budget builds, casual use |
| Carbon fiber | Sporty, modern | Excellent | High | Performance-focused builds |
| Wood grain finish | Classic, upscale | Moderate | Mid | Luxury or traditional carts |
| Marine-grade plastic | Functional | Very good | Mid | Coastal or wet climates |
| Metal (aluminum) | Industrial, sleek | Excellent | Mid-High | Heavy-duty or utility carts |
For most golf cart owners, ABS plastic or marine-grade plastic hits the sweet spot between cost and performance. If you live near the coast or deal with frequent rain, marine-grade plastic resists moisture and UV damage far better than standard options. Carbon fiber is a premium choice that looks incredible and handles heat and impact well, but you’ll pay for it.
Design features worth prioritizing:
Model compatibility is critical. A dash kit built for a Club Car DS will not fit a Yamaha Drive without modification. Always verify fitment before purchasing. You can explore dash kit material upgrades and performance and style upgrade ideas to get a broader sense of how your material choice fits into a larger upgrade plan.
Climate matters more than most people think. In hot, sunny regions, darker materials can absorb heat and become uncomfortable to touch. Lighter colors and UV-resistant finishes make a real difference if your cart sits in direct sunlight regularly.
Once you’ve selected your ideal kit, here’s how to make installation smooth and effective. The good news is that installing dash kits does not typically require major electrical modification, which means most owners can handle this as a weekend DIY project.
Step-by-step installation guide:
“Taking the time to plan your accessory layout before you install the dash panel is the single biggest time-saver in the whole process. Once the panel is secured, retrofitting additional mounts becomes much harder.”
Common novice mistakes include improper panel alignment and skipping wire concealment, both of which lead to a messy result that undermines the whole upgrade. Loose wires vibrate against panels, create noise, and can cause shorts over time.
Pro Tip: Use a fuse tap when adding battery meters or audio systems to your new dash. It keeps your wiring clean, protects your accessories, and avoids the need to splice into existing wires. Plan all your functional dash upgrades before installation so you can route everything in one pass.
Fitment issues are the most frustrating pitfall. Even kits marketed as “universal” often need minor trimming or drilling. Read reviews from owners of your specific cart model before buying.
With your dash kit in place, here’s how it can be the launchpad for exciting modifications. The flat, reinforced surface of a quality dash kit opens up a whole category of accessories that simply weren’t possible on a bare factory dash.
Dash kits make mounting electronics and accessories possible without major wiring changes, which is a huge advantage for owners who want to upgrade gradually rather than all at once.
Top 5 functional upgrades after installing a dash kit:
Real-world enthusiasts consistently report that once they installed a dash kit, they found themselves adding two or three accessories within the first few months simply because the mounting options were finally there. The dash kit didn’t just improve the look. It changed what was possible.
Useful dash upgrades like improved storage and lockable compartments also add daily practical value that goes beyond electronics. And if you want a broader view of what’s possible, browsing top dash upgrades gives you a solid roadmap for prioritizing your next steps.
Pro Tip: Before you finalize your dash kit installation, sketch out where every accessory you might ever want will sit. Leave space between items for easy access and clean aesthetics. Crowding your dash makes it harder to use and harder to service later.
Here’s the honest truth that most upgrade guides skip over: the golf cart community tends to treat dash kits as a vanity purchase. Buy it, install it, take a photo, move on. But experienced owners know that a dash kit is actually the most strategic upgrade you can make early in your build.
Every accessory you add later, whether it’s a battery meter that enhances your customization without major electrical work, a sound system, or a set of rocker switches, will be cleaner, easier, and better-looking if you started with a proper dash foundation. Doing it in reverse, bolting accessories onto a factory dash and then trying to upgrade the panel around them, is a frustrating exercise in rework.
The contrarian view worth holding is this: a dash kit is infrastructure, not decoration. Think about interior customization the way you’d think about framing a house. Nobody brags about the framing, but everything else depends on it. Owners who plan their dash upgrade first end up with cleaner builds, fewer headaches, and better resale value. That’s the real argument for making it your first move.
Ready to find the perfect dash kit? Here’s where to start your search.
At Golf Cart Stuff, we carry a wide selection of dash kits and golf cart accessories built for the most popular cart models on the market. Whether you’re driving a Club Car, Yamaha, or EZGO, you’ll find options designed to fit your specific cart without modification headaches.

Browse our Club Car dash kits or check out our full lineup of EZGO dash kits to find the right fit for your build. Every product page includes compatibility details, so you can shop with confidence and know exactly what you’re getting before it arrives at your door.
Dash kits usually include replacement panels, storage pockets, cup holders, and mounting spots for accessories. Many kits also offer aesthetic upgrades and storage options that go well beyond a basic panel swap.
Yes, most dash kits are designed for easy DIY installation using basic tools like a screwdriver and trim removal tool. Installing dash kits does not typically require major electrical modification, making it a solid weekend project.
Absolutely. Dash kits provide a flat, sturdy surface for mounting meters, audio controls, USB ports, and more. Upgrading your dash enables further mods without requiring major electrical work.
Improper panel alignment and not concealing wires are the most frequent installation errors. Reviewing common dash installation mistakes before you start will save you time and frustration on the back end.
Explore our store to see what our products and resources can do for you.

Leave a comment