


Your Cart Is Our Priority
Explore our store to see what our products and resources can do for you.

TL;DR:
- Installing a rear seat kit increases a golf cart’s passenger capacity and enhances comfort. Proper compatibility, tool preparedness, and precise alignment during installation are essential for safety and durability. Regular post-installation inspections ensure lasting performance and passenger safety.
You finally want to bring the whole crew along, but your golf cart only has room for two. It’s a frustrating situation that thousands of golf cart owners face every weekend, whether you’re navigating a sprawling golf course, a lakeside community, or a large private property. The good news is that installing a rear seat kit is one of the most rewarding DIY upgrades you can make. It adds real passenger capacity, boosts comfort, and can transform how you use your cart every single day. This guide walks you through every stage, from choosing the right kit to final safety checks.
| Point | Details |
|---|---|
| Plan before starting | Select the right kit for your cart and gather all tools to avoid mid-install surprises. |
| Follow clear steps | Careful step-by-step installation ensures safety and a stable seat for years to come. |
| Check weight limits | Most kits handle up to 400 pounds—never overload and perform regular safety checks. |
| Inspect regularly | Monthly inspections keep your rear seat secure and prolong its lifespan. |
| Troubleshoot smartly | Address rattles or misalignment promptly to maintain comfort and safety. |
Now that you know what you’re about to achieve, let’s make sure you’re equipped and ready for a smooth installation. Jumping in without the right tools or the wrong kit for your model is the fastest route to frustration. A little prep work here saves significant headaches later.
Choosing the right kit for your golf cart model
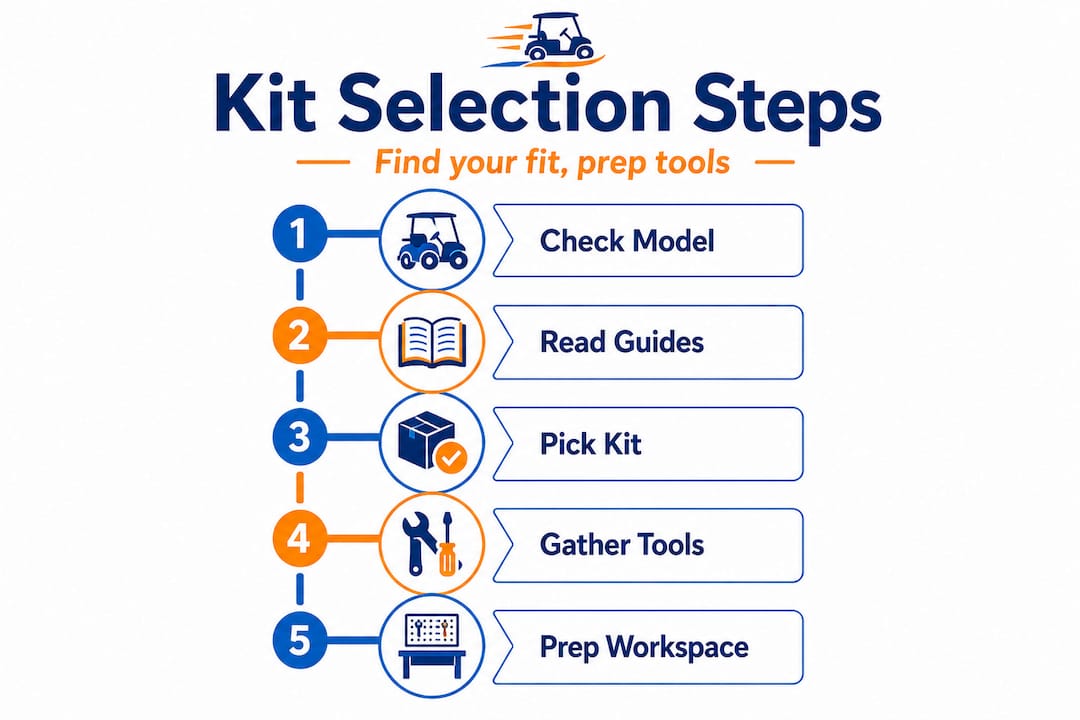
Not every rear seat kit fits every cart. This is one of the most common and costly assumptions DIYers make. Major golf cart brands, including Club Car, Yamaha, and EZGO, each have distinct frame measurements and mounting point configurations. A kit built for a Club Car DS will not align correctly on a Yamaha Drive or an EZGO TXT, even if the dimensions look close on paper. Before you buy anything, locate your cart’s make, model, and year, which is usually stamped on a plate beneath the seat or on the frame. Use that information to cross-reference with the kit’s compatibility guide. If you’re exploring your choosing rear seat kits options, that resource breaks down compatibility details to help narrow your search quickly.
Tools and materials checklist
| Item | Purpose |
|---|---|
| Socket wrench set (3/8" and 1/2") | Removing and tightening bolts |
| Power drill with bits | Mounting brackets |
| Rubber mallet | Seating brackets without damage |
| Torque wrench | Precise final tightening |
| Safety glasses | Eye protection during drilling |
| Work gloves | Hand protection |
| Thread-locking fluid (Loctite) | Preventing bolt loosening over time |
| Tape measure | Verifying alignment |
| Rear seat kit with all hardware | Core component |
Most kits include the seat frame, cushion assembly, mounting brackets, and all associated bolts and nuts. Before you start, lay everything out on a clean surface and check the parts against the included manifest. Missing a single bracket can halt the entire job.
Here’s what else to confirm before you begin:
Independent testing confirms 400lb capacity in real-world conditions, which underscores why proper installation and seat selection matter from the very start. A correctly mounted kit holds up. A rushed one won’t.
Pro Tip: Organize all hardware into labeled zip-lock bags by step before you remove any existing components. This prevents the chaos of mixing up similar-looking bolts mid-installation and keeps your workspace manageable.
Learning more about golf cart seat repair techniques alongside your installation prep will also give you a better feel for how seat components connect to the frame. And if you’re already thinking ahead to the finished look, check out ideas for how to customize golf cart interiors once the rear seat is in place.
With your tools gathered and kit checked for compatibility, it’s time to start the installation. Follow these steps carefully and resist the urge to rush. Each step builds on the last, and skipping ahead creates alignment problems that are much harder to fix later.
Installation walkthrough
For anything that feels unclear during installation, the parts FAQ & instructions page covers common assembly questions in detail.
Standard vs. flip seat: What’s the difference?
| Feature | Standard rear seat | Flip seat (fold-down) |
|---|---|---|
| Seating mode only | Yes | No (dual function) |
| Converts to cargo area | No | Yes |
| Installation complexity | Lower | Moderate |
| Best for | Dedicated passenger use | Mixed passenger/cargo needs |
| Cost | Generally lower | Generally higher |
The flip seat design is especially popular for owners who occasionally haul gear but also want passenger capacity on demand. The DIY seat repair steps article gives you a solid foundation for understanding how seat hardware goes together if you run into any uncertainty with the flip-seat mechanism.
Pro Tip: Pre-fit every bolt by hand before committing to any final tightening. A bolt that goes in crooked and gets force-tightened can strip the thread on the bracket, which means replacing hardware or the bracket itself. Hand-fitting first takes two extra minutes and saves potentially an hour of rework.
If your cart has a lift kit installed, note that raised frames sometimes require spacer adjustments on the rear seat brackets. The golf cart lift kit guide addresses these specifics for lifted models.
After mounting your seat, safety and maintenance should be your next priorities for lasting comfort and reliability. A rear seat that looks great but isn’t properly secured is a serious hazard for passengers, especially on uneven terrain or during tight turns.
Safety note: Never exceed the manufacturer’s stated weight rating for your rear seat kit, and never skip post-installation safety checks. Passenger safety depends on the integrity of every bracket, bolt, and connection point. Real-world 400lb weight testing confirms capacity, but this assumes correct installation and regular maintenance.
Post-installation safety checklist
Long-term maintenance tips
Consistent maintenance is genuinely what separates a rear seat kit that lasts five or more years from one that starts wobbling after a single season.
Even with the best preparations, a few common mistakes can trip up first-time installers. Here’s how to keep your project on track.
Common mistakes and their quick fixes
If your seat still feels unstable after following these steps, revisit the rear seat kit guide for model-specific advice. Some compatibility issues only surface after installation, and knowing what to look for helps you course-correct quickly.
Here’s a candid truth we’ve seen play out repeatedly: the biggest enemy of a good rear seat installation isn’t a lack of tools. It’s impatience. Most problems we hear about, from crooked seats to rattling brackets to stripped threads, trace back to someone deciding a particular step “looked good enough” and moving on before confirming it actually was.
The pre-fit step gets skipped more often than any other. Owners are eager to see the finished result, so they go straight to tightening rather than confirming alignment first. That costs them an extra 30 minutes of disassembly and rework later. Patience during the alignment phase isn’t optional. It’s the whole game.
There’s also a persistent myth that rear seat kits are truly “universal.” They are not. The word “universal” in product descriptions usually means the kit covers a broad range of models within a specific brand family, not every golf cart ever made. Always verify against your exact make, model, and year. The interior upgrades for comfort resource does a solid job of reinforcing why model-specific choices matter across all cart accessories, not just seats.
The other thing most guides don’t emphasize enough: the first week after installation is critical. Bolts settle. Frames flex slightly under real passenger weight. Re-tightening after that initial break-in period is not optional maintenance. It’s part of the installation itself. Real-world results back this up. Inspections confirmed longevity is directly tied to regular check-ups, not just the quality of the initial install.
Our honest advice is this: slow down, check twice before tightening, and treat that first post-install inspection after a few days of use as seriously as you treated the installation day itself.
If you’re ready to add capacity and comfort to your golf cart, here’s how to take the next step.
Finding a rear seat kit that actually fits your cart should not be a guessing game. At GOLFCARTSTUFF.COM™, we stock model-specific options so you’re working with parts that are designed to go together, not forced together.

Whether you’re upgrading a Club Car DS parts setup or looking at EZGO rear seat kits for your specific model, we carry the parts built to match your cart’s frame and mounting points. Once the seat is in, browse our full range of golf cart accessories to complete the upgrade, from seatbelts to weather enclosures to lighting. Every item ships with the compatibility information you need to buy with confidence and install without surprises.
Most golf cart owners can complete this installation using common hand tools and the included instructions, though a second person is helpful for lifting and aligning heavier seat assemblies. Independent reviews confirm that proper installation delivers reliable results without professional involvement.
Check your cart’s make, model, and year, then match that information against the kit’s compatibility guide or the supplier’s fit chart before purchasing. When in doubt, contact the retailer directly with your cart’s details.
Many rear seat kits have a tested capacity of 400 pounds, but always verify the specific rating listed for your kit since capacities vary by model and brand.
Check all hardware and fasteners monthly after installation and re-tighten any loose bolts promptly, especially during the first month when components are still settling under load.
Rattling during use, visibly crooked seating, wobbly brackets, or any lateral movement in the seat frame are all warning signs. Always perform a full stability test before allowing passengers to ride.
Explore our store to see what our products and resources can do for you.

Leave a comment