



Your Cart Is Our Priority
Explore our store to see what our products and resources can do for you.

You can absolutely perform a reliable toe adjustment at home. The short version: measure the front-to-rear distance across your tires, adjust the tie-rod sleeves, roll the car, re-measure, and torque the jam nuts. Camber and caster are a different story. Most modern vehicles have no factory adjustment for those angles, so if they’re out of spec, you’re looking at aftermarket hardware or a shop visit, not a wrench on a tie-rod.
One non-negotiable before you touch anything: inspect your steering and suspension components first. Worn tie-rod ends, loose ball joints, or a bent control arm will make any alignment work pointless and potentially dangerous. Fix the mechanical problems first, then align.
A reliable DIY toe alignment requires a level surface, repeatable reference points, rolling the vehicle after every adjustment, and replacing worn suspension parts before touching the tie-rods.
| Point | Details |
|---|---|
| Toe is the DIY angle | Camber and caster usually require special hardware or a shop; focus your home work on toe. |
| Inspect before you adjust | Replace worn tie-rod ends, ball joints, or bent control arms before any alignment attempt. |
| Roll the car every time | Roll the vehicle forward and back after each tie-rod adjustment before re-measuring. |
| Quarter-turn increments | Adjust tie-rod sleeves in quarter-turn steps and re-measure; small changes add up quickly. |
| Shop check after DIY work | A professional 3D alignment confirms all angles meet factory tolerances, especially for daily drivers. |
You don’t need a lift or a $10,000 machine. Here’s what actually matters:
Essential tools:
Helpful but optional:
Consumables and safety gear:
Pro Tip: The string method is the most repeatable low-cost approach. Two lengths of string stretched parallel to the vehicle’s centerline, squared to the rear axle, give you a fixed reference plane that tape alone can’t match. Start there before spending money on gauges.
Work on a flat, level concrete surface. A crowned or sloped driveway introduces measurement error before you’ve even picked up a wrench, and a squared string rig on a sloped surface will give you false readings every time.
Run through this before touching any adjustment:
Then inspect the steering and suspension before any adjustment. Check for play in the tie-rod ends by grabbing each front tire at 9 and 3 o’clock and pushing/pulling. Check ball joints by placing a pry bar under the tire and watching for vertical movement. Look for torn boots, bent control arms, and uneven ride height side to side. Worn components must be replaced before aligning. Aligning a car with a loose ball joint is like straightening a picture frame on a wall that’s about to fall over.
Four angles govern how your wheels sit and track. Knowing which ones you can adjust at home saves time and prevents frustration.
The practical takeaway: toe is your target. Camber, caster, and toe interact, so excessive camber on one side often signals deeper suspension damage. Don’t try to compensate for a camber problem by tweaking toe.
Common symptoms by angle:
OEM tolerances vary by vehicle. A typical street car runs somewhere around 0 to 1/8 inch of total toe-in, but always pull the actual spec from your repair manual before measuring.
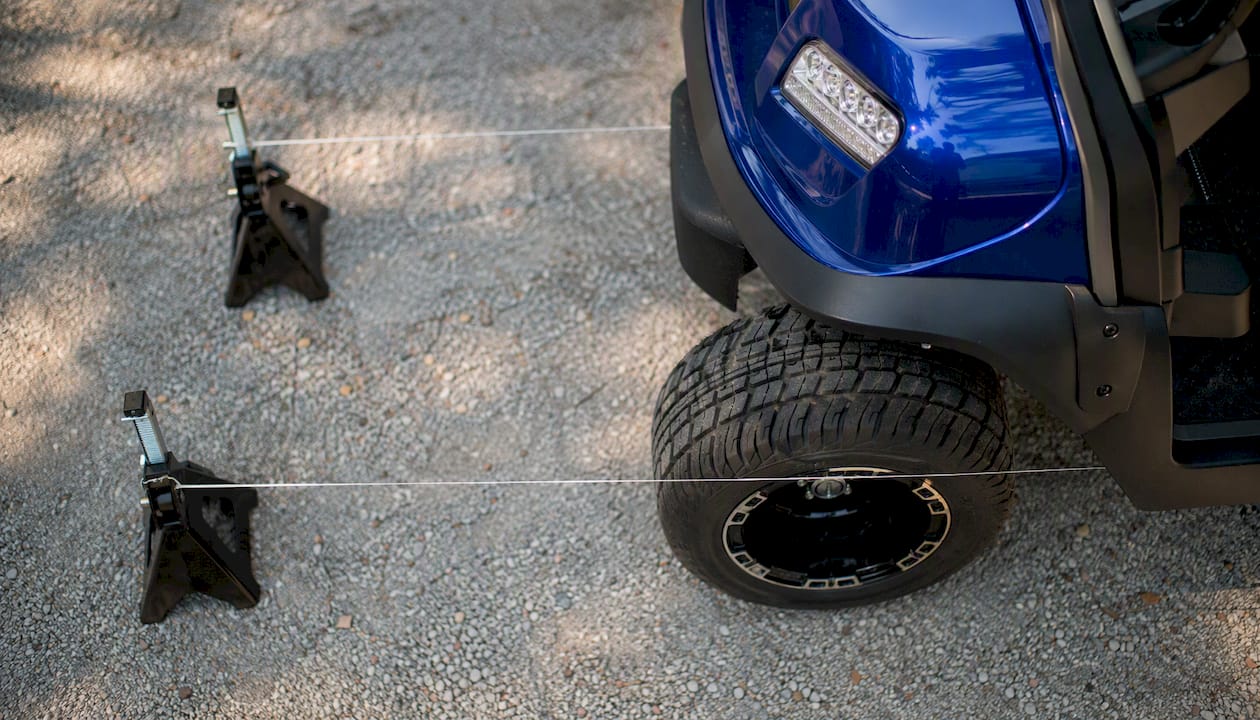
Stretch two strings parallel to the vehicle’s centerline, one on each side, anchored to jack stands at bumper height. Square them to the rear axle by measuring equal distances from the rear wheel centers to each string. Once squared, measure the gap between the string and the front of each front tire’s rim, then the rear of each rim. The difference between front and rear measurements is your toe value for that wheel.
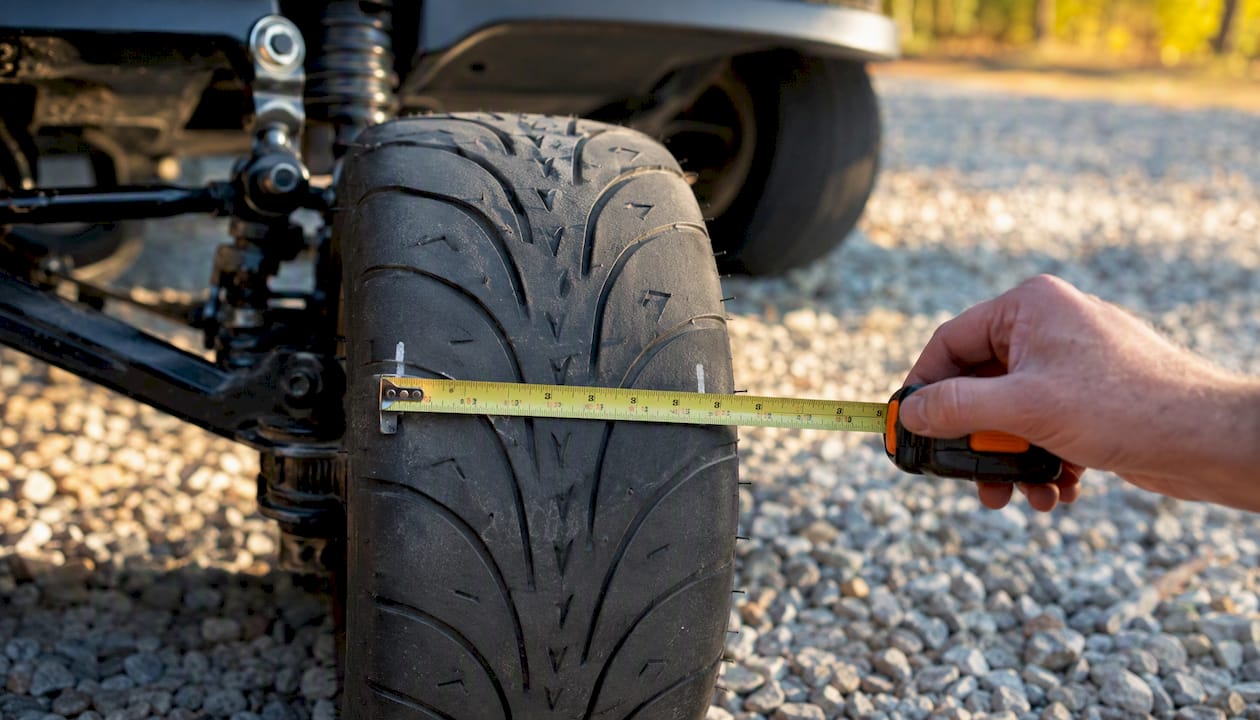
Mark two points on each front tire’s tread at hub height: one facing forward, one facing rearward. Measure the distance between the two front-facing marks (front measurement), then between the two rear-facing marks (rear measurement). Subtract front from rear to get total toe.
Repeatability matters. After every adjustment, roll the vehicle forward and back several feet before re-measuring. This lets the steering linkage settle into its natural position. Skipping this step is the single most common reason DIY alignments produce inconsistent numbers.
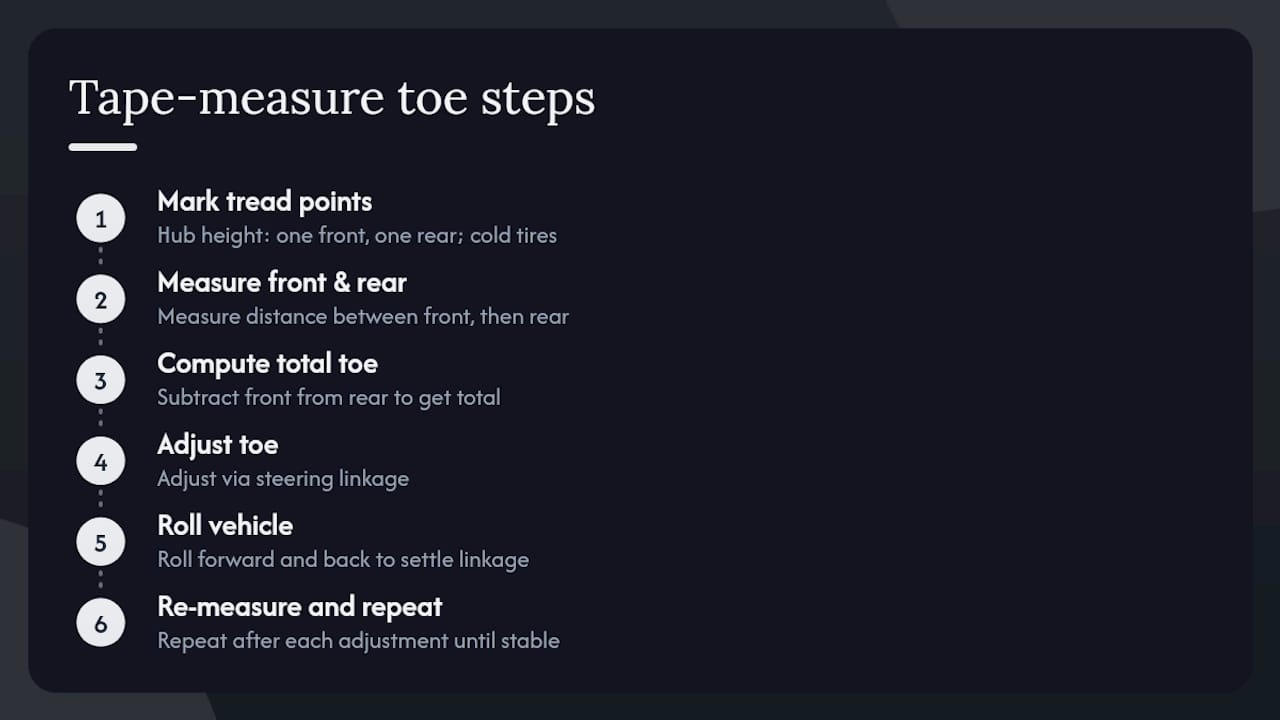
Hot tires expand slightly and can affect readings. Measure on cold tires whenever possible.
A reliable DIY process always ends with a shop check when possible, particularly if you’ve done significant suspension work.
Re-measure both front wheels after torquing the jam nuts. Confirm the front-to-rear differences match your target spec on both sides. Turn the steering wheel lock to lock by hand with the vehicle on stands. It should move smoothly with no binding or rough spots.
For the test drive, find a straight, flat road with no crown. Drive at low speed first, then highway speed if conditions allow. Watch for:
If the steering wheel is noticeably off-center after the adjustment, don’t compensate by adding more toe to one side. That masks the real problem. Check whether camber or caster is pulling the wheel, or whether the rear thrust angle is the culprit. Professional 3D alignment machines catch these interactions precisely, which is why a shop visit after DIY toe work is worth the cost for daily drivers.
Inspect before you align. Replace before you adjust. Specifically, stop and get professional help when you find:
Red flags during or after the adjustment:
Shops use 3D imaging systems that measure all four wheels simultaneously against the vehicle’s actual centerline. No string rig replicates that. For a daily driver, a professional alignment after DIY toe work confirms you haven’t introduced a secondary problem.
Check alignment after any of these events: hitting a significant pothole or curb, completing suspension work, noticing new pulling or uneven wear, or as part of annual maintenance. Bridgestone recommends routine checks that include tire pressure, suspension inspection, and alignment verification, especially after impacts.
Between full checks, three habits extend alignment life: rotate tires on schedule, keep tire pressure at spec, and inspect suspension wear items (tie-rod ends, ball joints, control arm bushings) at every oil change. Tire balancing is a separate service from alignment. Balancing corrects wheel vibration from mass imbalance; alignment corrects the angle the wheel sits and tracks. Confusing the two leads to fixing the wrong problem.
Golf carts share the same alignment principles as passenger cars but with simpler suspension geometry. Most carts use a solid front axle or a basic A-arm setup with limited adjustment points. Toe is still the primary DIY-adjustable angle, and the string and tape methods work just as well on a cart as on a car.
A few things to watch specifically on golf carts:
Golfcartstuff’s golf cart steering alignment guide covers model-specific procedures and torque specs in detail. For suspension wear items, the golf cart suspension troubleshooting guide is a practical starting point before any alignment attempt.
Pro Tip: Before adjusting toe on a cart with a recent lift kit, check the alignment basics guide for small vehicles to confirm whether your specific lift changes the factory toe spec. A lift that adds two inches of height can shift the geometry enough that the stock spec no longer applies.
The biggest mistake isn’t the measurement method. It’s skipping the roll. Every experienced DIYer who has done home alignments has made this mistake at least once: adjusted the tie-rod, measured immediately, declared success, and then driven the car only to find it still pulling. The steering linkage needs to settle. Roll the car. Every single time.
The second most common problem is inconsistent reference points. If your tape measure lands on a different spot on the tread each time, your numbers are meaningless. Mark the exact measurement point with a wax pencil and hit it every time.
One practical shortcut that holds up: before loosening any jam nut, count the exposed threads on the tie-rod end and write it down. If you overshoot your adjustment, you have an exact reference point to return to without guessing.
Log your measurements in a notebook or a phone note. Knowing your baseline toe from six months ago tells you whether a new symptom is a drift from a previous setting or something mechanical.
Explore our store to see what our products and resources can do for you.

Leave a comment