


Your Cart Is Our Priority
Explore our store to see what our products and resources can do for you.

TL;DR:
- Installing a golf cart canopy involves securing a roof structure to the frame using specific hardware, with the process lasting 30 to 60 minutes for canvas tops or 1 to 2 hours for hardtops. Proper preparation, including cleaning mounting surfaces and gathering tools, is essential to ensure a tight, rattle-free, and waterproof fit that lasts. Regular maintenance and correct tensioning extend the lifespan of the canopy and prevent alignment issues or fabric damage.
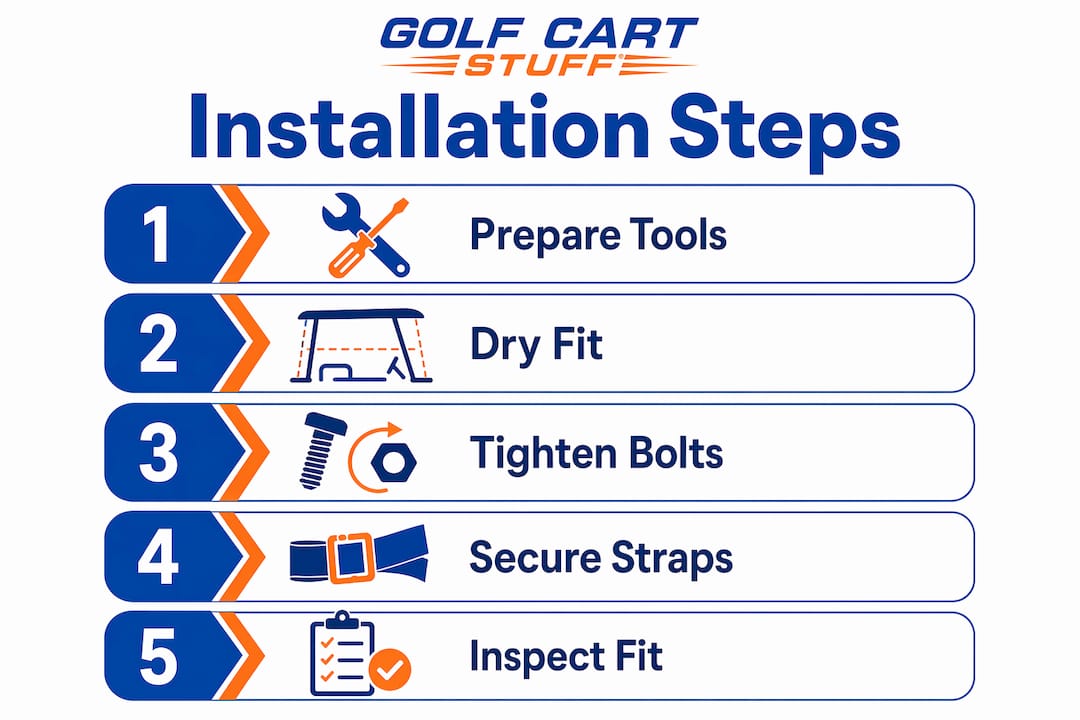
Installing a golf cart canopy means securing a roof structure to your cart’s frame using specific mounting hardware, and the complete process takes 30–60 minutes for canvas tops or 1–2 hours for hardtop models. The right preparation separates a tight, rattle-free install from one that leaks or loosens after a single round. This guide covers both canvas and hardtop canopy types, the exact tools you need, and the numbered steps that get you from bare frame to finished roof. Whether you own a Club Car DS, a Yamaha G-series, or an EZGO TXT, the core process is the same.
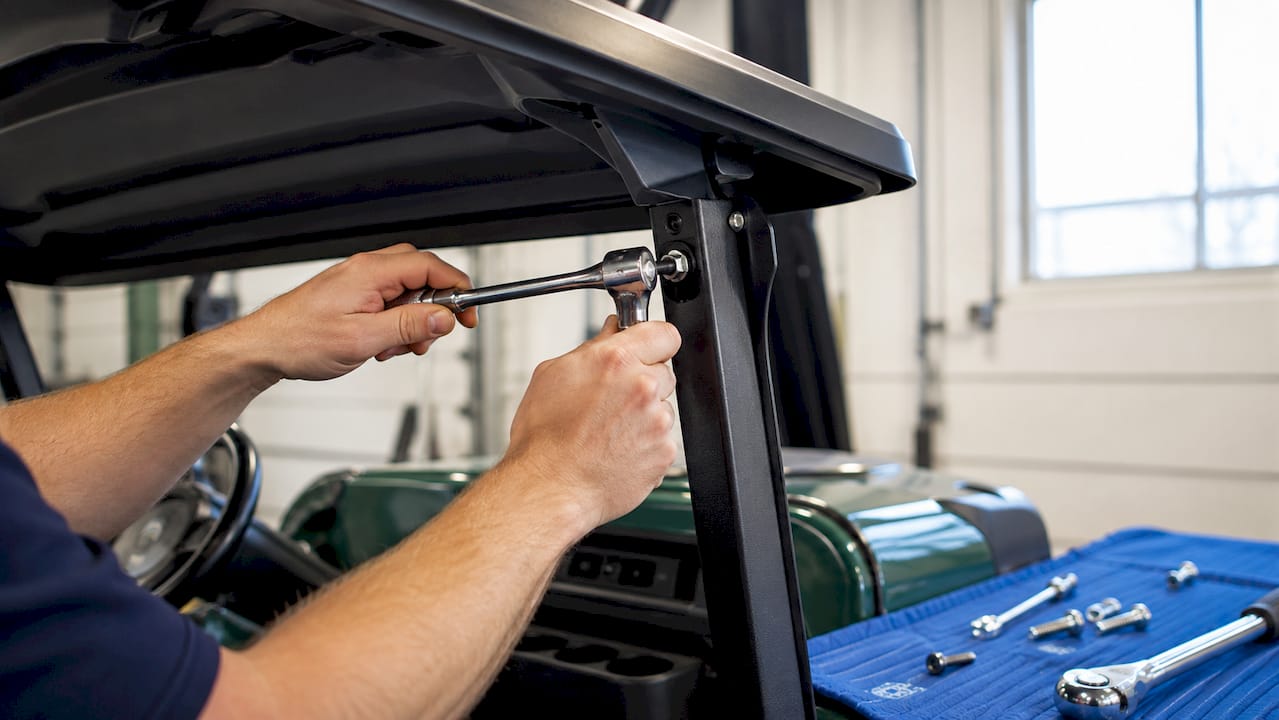
Before you touch a bolt, preparation determines how smooth the install goes. Standard preparation includes cleaning mounting areas, inspecting brackets for wear, and gathering every tool you need before you start. Skipping this step is the single most common reason a canopy ends up misaligned or loose within a few weeks.
Gather these before you begin:
| Tool / Material | Purpose |
|---|---|
| Socket set (3/8" drive) | Tightening and removing mounting bolts |
| Cordless drill with bits | Drilling new holes if required |
| Measuring tape and level | Verifying alignment before fastening |
| Marker or chalk | Marking drill points accurately |
| Rubber mallet | Seating tracks without damaging surfaces |
| Waterproof sealant | Preventing water intrusion at bolt holes |
| Anti-seize compound | Protecting bolt threads for future removal |
| Zip ties | Securing excess canvas edges |
| Screwdrivers (flat and Phillips) | Removing old hardware and securing trim |
Applying anti-seize compound on every bolt before tightening saves you significant frustration at the next service interval. Bolts that sit exposed to weather for months can fuse to aluminum frames, and anti-seize prevents that entirely.
Pro Tip: Lay all tools and hardware on a clean tarp next to the cart before starting. Hunting for a socket mid-install adds time and causes mistakes.
Compatibility is also worth confirming before you buy. Frame and wheelbase dimensions matter more than brand name when matching an aftermarket canopy. Measure your mounting point spacing and compare it to the canopy spec sheet. You can also review the roof support guide from Golfcartstuff for a detailed breakdown of frame dimensions and hardware compatibility.
Canvas tops are the most common golf cart shading option for leisure owners. They install quickly, require no drilling on most models, and need only a socket wrench and zip ties for a complete install. Follow these steps in order.
Overtightening canvas straps concentrates stress on specific points and causes premature tearing. The fabric should feel taut when you press it, not stretched to its limit.
Pro Tip: Pull each strap snug enough to remove slack, then stop. A drum-tight canvas will tear at the attachment points within a season.
Hardtop installations require more precision than canvas setups. Professional installation labor runs $100–$300 when drilling or modifications are needed, so getting the DIY steps right saves real money. You will need a helper to hold the top steady while you align and fasten.
Pro Tip: Pre-measure and use a level before drilling any new holes. Misaligned holes are permanent, and fixing them requires additional hardware or professional help.
| Factor | Canvas Canopy | Hardtop Canopy |
|---|---|---|
| Install time | 30–60 minutes | 1–2 hours |
| Tools required | Socket wrench, zip ties | Socket set, drill, level, sealant |
| Helper needed | Usually not | Yes |
| Drilling required | Rarely | Sometimes |
| Skill level | Beginner | Intermediate |
Even careful installers run into problems. Knowing what to expect keeps a minor snag from turning into a damaged cart or a wasted afternoon.
Safety note: Never overtighten bolts on plastic mounting brackets. Plastic cracks under excess torque, and replacement brackets can be hard to source. Snug is enough.
Professional installation is the right call when the job requires drilling new holes into the frame or modifying structural components. The $100–$300 labor cost is far less than repairing a cracked frame or a misaligned roof system. You can also browse golf cart enclosure examples from Golfcartstuff to see how different mounting systems look when properly installed.
A properly installed canopy lasts years with basic upkeep. Regular maintenance includes inspecting mounts, cleaning canopy materials correctly, and resealing bolt holes to extend canopy lifespan.
Pro Tip: At the start of each season, run through the full bolt-check sequence before your first ride. Catching a loose rear strut in the garage beats finding out on the course.
A successful golf cart canopy install depends on preparation, correct tension, and a level fit before any bolt is fully tightened.
| Point | Details |
|---|---|
| Preparation is non-negotiable | Clean mounts, verify fitment, and gather all tools before touching the canopy. |
| Canvas installs are beginner-friendly | Most canvas tops take 30–60 minutes with a socket wrench and zip ties. |
| Hardtops need a helper and a level | Align and level before tightening to avoid rattles and water gaps. |
| Even tension extends canopy life | Snug straps, not tight ones, prevent fabric tearing at attachment points. |
| Regular maintenance protects your investment | Monthly bolt checks and annual resealing keep the canopy secure and watertight. |
The number one mistake I see is rushing the dry-fit. People want to get the top on and get riding, so they skip the step where you set the canopy in place without any fasteners and check every mounting point. That single shortcut causes 80% of the rattles, leaks, and misalignment complaints I hear about.
The second thing I’d tell any first-timer is to get a helper for hardtop installs. It is not optional. Holding a fiberglass top level while threading bolts solo is genuinely difficult, and the result is almost always a slightly crooked roof that you will be chasing with a wrench for months.
I also think people underestimate how much the anti-seize step matters. It takes 30 seconds per bolt and makes the next removal effortless. Skip it and you may be cutting bolts off an aluminum frame two years from now.
If the install requires drilling new holes or modifying the frame, stop and call a professional. The $100–$300 labor cost is a reasonable price for avoiding a cracked strut or a stripped mounting point. There is no shame in knowing where your comfort level ends.
Finally, watch a model-specific video before you start. Written instructions get you 80% of the way there. A video showing your exact cart model covers the other 20%.
— Roshan
Ready to put these steps into practice? Golfcartstuff carries a full range of canopies, mounting hardware, and installation accessories for the most popular cart models on the market.

Browse Club Car DS parts for model-specific canopy hardware, mounting brackets, and strut components. If you ride a Yamaha G-series, the Yamaha G1-G22 parts collection has compatible tops and installation kits ready to ship. For a broader look at shading and weather protection options across all cart types, the golf cart accessories collection covers everything from canvas tops to full enclosure kits. Golfcartstuff makes it straightforward to find the right fit for your cart and your budget.
Canvas canopy installations typically take 30–60 minutes with basic hand tools. Hardtop installations require 1–2 hours and a helper for safe alignment.
Most canvas tops attach to existing mounting points without drilling. Some hardtop models require drilling, in which case professional installation is recommended to avoid frame damage.
Skipping the dry-fit and overtightening bolts are the two most frequent errors. Dry-fitting first confirms alignment, and snug rather than tight fastening prevents cracked brackets and torn fabric.
Verify frame dimensions and wheelbase measurements against the canopy’s spec sheet. Compatibility depends on mounting point spacing, not just brand name, so always measure before purchasing.
Check mounting bolts monthly and reapply waterproof sealant annually. Release canvas strap tension before off-season storage to prevent fabric stretching and mildew.
Explore our store to see what our products and resources can do for you.

Leave a comment