

Your Cart Is Our Priority
Explore our store to see what our products and resources can do for you.

Yes, most golf cart owners can fix their own steering. If you can turn a wrench and follow a torque spec, the tie-rod ends, bushings, and basic gearbox work on EZGO, Club Car, and Yamaha carts are well within DIY range. The workflow is always the same shape: diagnose the worn part, lift and secure the cart, pull the failed component, install the replacement, torque everything to spec, then check toe and take a slow test drive.
A single outer tie-rod end swap runs 30 to 90 minutes per side and costs $15 to $40 in parts. A full steering-box or rack replacement takes 2 to 4 hours and runs higher depending on the model. Golfcartstuff stocks the tie-rod ends, bushings, gearboxes, and hardware for EZGO, Club Car, and Yamaha carts, and a related motor troubleshooting guide on the site reports an 85% first-fix success rate when owners follow a structured diagnostic order instead of guessing. Roshan, who writes most of the hands-on repair content for Golfcartstuff, built this workflow around that same logic: check the cheap, easy stuff first.
A structured diagnose-then-replace workflow lets most owners fix tie-rod, bushing, and gearbox steering problems on EZGO, Club Car, and Yamaha carts without a shop visit.
| Point | Details |
|---|---|
| Check tire pressure first | Underinflated front tires (below the 18 to 22 PSI range) cause a lot of heavy-steering complaints before any part fails. |
| Lift on stands, never a jack alone | Secure the cart on rated jack stands before working underneath it. |
| Mark before you disassemble | Matchmark the steering shaft and count tie-rod threads to preserve alignment during reassembly. |
| Verify with a toe check | Front tread measurement should run about 1/8 to 1/4 inch less than the rear after reassembly. |
| Buy fitment-correct parts at Golfcartstuff | Golfcartstuff’s model-specific category pages help confirm the right tie-rod ends, bushings, and gearboxes before you order. |
Steering work puts you underneath a vehicle with the front wheels off the ground, so skipping safety steps here is where DIY jobs go wrong. Disconnect the battery on electric carts, chock the rear wheels, and lift with a floor jack before setting the frame on jack stands. Never trust a jack alone to hold the cart while you’re under it.
Tools and PPE checklist:
Following the same lifting and pre-repair sequence outlined in Golfcartstuff’s safety inspection guide keeps the job predictable instead of improvised.
Pro Tip: Before you loosen a single bolt, scratch a matchmark across the steering shaft and gearbox coupler with a file or paint pen. It takes ten seconds and saves you from guessing at orientation during reassembly.
Start with the cheapest possible fix: tire pressure. Golf carts typically run 18 to 22 PSI in the front tires, and underinflation is a leading cause of heavy, hard-to-turn steering that has nothing to do with worn parts. Check that before you order anything.
Once the cart is up on stands, work through these checks in order:
Model behavior varies. EZGO TXT and RXV carts use different tie-rod and rack setups, so parts aren’t interchangeable between them. Club Car models tend to wear at the column bushings first. Yamaha carts often just need the steering box locking nut loosened and the adjustment screw tuned rather than a full replacement.
Pro Tip: Before pulling an old tie-rod end, count the exposed threads or measure the length with calipers. Matching that on the new part gets your toe close to spec before you even touch an alignment tool.
The sequence stays consistent no matter which part failed: prep the cart, confirm the diagnosis, lift and secure, gain access, swap the worn component, reassemble using your matchmarks, torque everything, grease the fittings, and test drive.
Replacing an outer tie-rod end (30 to 45 minutes per side with basic hand tools):
Steering column bushing replacement:
Steering gearbox service: if the box just feels stiff or slightly loose, greasing the input shaft and adjusting per the model’s spec often solves it, which is exactly the approach that works on Yamaha’s locking-nut design. If the gearbox grinds, binds, or shows more than roughly 2 inches of play, replace it: mark shaft orientation, unbolt the pitman arm and tie rods, remove the old box, install the new one, torque every fastener to spec, then reconnect and recheck alignment.
King pins and spindles: test for seizure by turning the wheel and watching the spindle pivot. A dry but functional king pin usually just needs grease through the zerk fitting. A seized one may require press work and new bushings, along with anti-seize on reassembly so it doesn’t happen again.
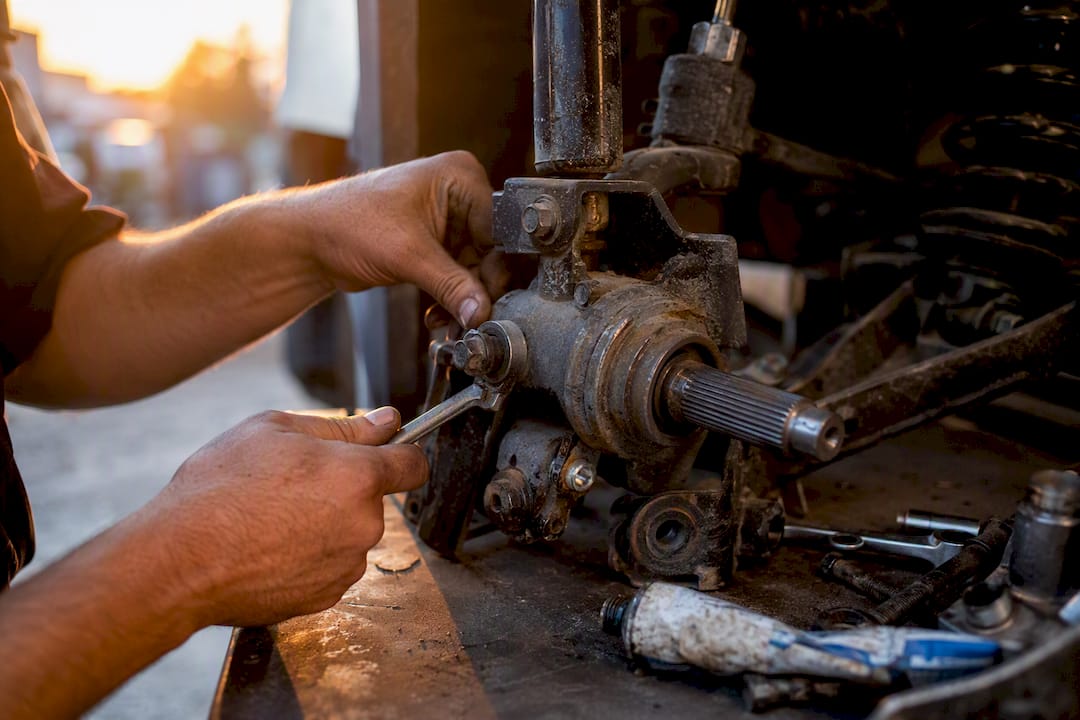
EZGO’s TXT and RXV platforms use different tie-rod geometry, so verify which one you have before ordering. Club Car carts wear at the spindle and bushing points most often. Yamaha’s steering box uses a locking nut separate from its adjustment screw, and a documented adjustment procedure can restore feel without a full teardown.
Before you call the job done, run through a static check: confirm every fastener is torqued, grease the fittings you just installed, reinstall the wheels, and lower the cart. With the wheels on the ground, check that the steering wheel sits centered and has minimal free play.
Basic toe check you can do at home:
Static checks take 10 to 15 minutes; a short test drive and recheck adds another 15 to 30. Golfcartstuff’s alignment guide walks through the same toe-in method in more depth, and the site’s step-by-step tire alignment article is worth bookmarking if you want a second reference for the measurement.
If the cart still pulls to one side, tires wear unevenly after your adjustment, or you’re just not confident in your toe measurement, that’s the point to schedule a professional alignment rather than keep guessing.
Before you buy anything, know your model, year, and serial number, plus which side (left or right) the part goes on. Thread direction matters too. If you already removed the old part, note the thread count or length so the new one matches.
Commonly needed parts:
Snap a photo of the assembly and your matchmarks before disassembly. It sounds excessive until you’re staring at a pile of parts three days later trying to remember which way the shaft was oriented. Fitment differs meaningfully between EZGO’s TXT and RXV lines, across Club Car’s model families, and among Yamaha’s steering-box variants, so check the fitment details on the parts page before you check out.
Pro Tip: A tie-rod end typically lasts several years of normal use, but if one side failed, inspect the other closely. Uneven wear usually means both are near the end of their service life.
Some situations aren’t worth the DIY risk. Frame or spindle damage from a curb strike or collision, visibly bent steering components, more than 2 inches of free play that a tie-rod swap doesn’t fix, and a seized king pin that needs press equipment all belong at a shop.
If the parts and labor for a full gearbox rebuild start approaching the cost of a professional replacement, let the shop handle it instead of sinking hours into a job with diminishing returns.
Pro Tip: Photograph the worn parts and write down your measurements (free play, toe numbers, thread depth) before you call a shop. It cuts diagnostic time and gets you a more accurate quote.
Roshan built this sequence around the same logic technicians use on the shop floor: check the simple, cheap things first, and don’t disassemble further than the problem requires. It’s the same principle behind the structured troubleshooting approach that shows an 85% first-fix rate on motor issues. Steering problems respond to the same discipline. Diagnose close to the wheel before you go near the column, replace only what’s actually worn, and the repair holds.
Guessing at fitment is how DIY steering jobs turn into return-shipping headaches. Golfcartstuff’s category pages let you filter by model and year so you’re not cross-referencing part numbers by hand.
Start with the Club Car parts page or the Club Car DS collection if you’re working on a DS-body cart, and use the Yamaha golf cart parts page for G-series and Drive2 models. Cross-check your VIN or serial number against the fitment notes on each listing, and compare thread measurements or photos from your old part against the new one before installing. Don’t forget the small stuff. Cotter pins and grease fittings are cheap, but a reused cotter pin is exactly the kind of shortcut that turns into a roadside failure. Golfcartstuff’s accessories collection carries that hardware alongside the main components, so you can order everything in one pass and get back to the repair instead of waiting on a second shipment.
Explore our store to see what our products and resources can do for you.

Leave a comment